Friday, May 30, 2014

My Scraps Sketch #83

Happy Friday, friends!  If you're looking for some sketchy inspiration, then today is your lucky day.  There's a new sketch up on the My Scraps Sketch Blog :)  It's a pretty simple sketch but has lots of creative possibilities. I flipped the sketch for my project.  Check it out!


Okay, so for this one, I went digging into my stash of stuff I've had on the shelves for a few years.  I have made myself promise to USE it!  Who cares if it's old?  It needs to be used...otherwise it's just collecting dust.  So I found this pack of Heidi Swapp Color Magic paper on my shelf.  I know I've had it for a few years and never opened it.  This stuff is making a comeback in her newer lines, so I thought it would be fun to play with it now :)

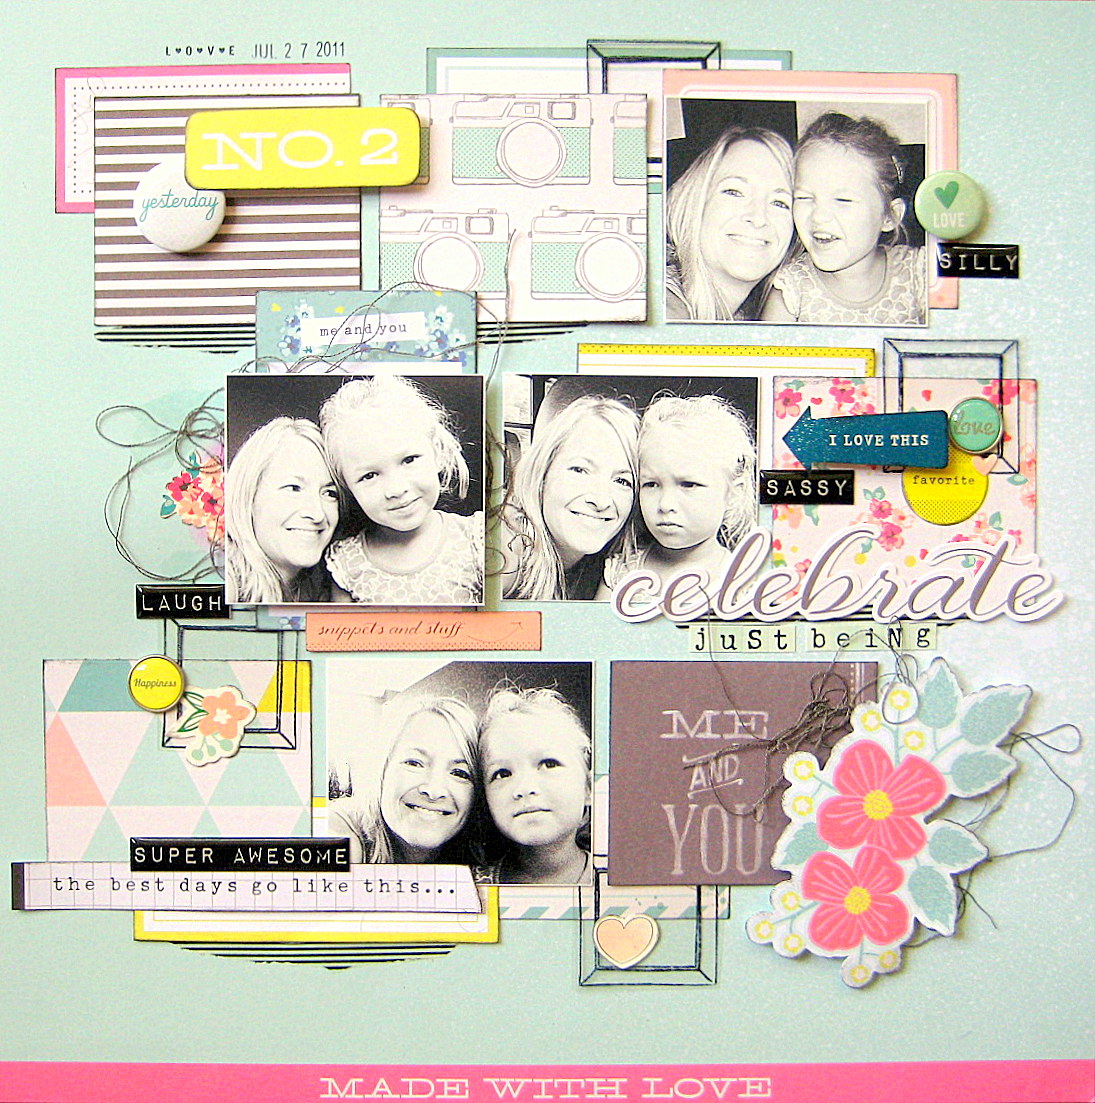
I decided to scrap these cute July 4th photos of my little goosie.  The fun thing about this Color Magic paper is that it works with mists or sprays, but it also works with paint.  I used both.  Now on the parts where it's smudged more solidly, I used gesso first.  Otherwise, the white parts shine through.  I just love this cool print, and I love how it turned out.

I added in some of the new Hazel and Ruby tissue paper I picked up at Michael's...it's SUPER cool to play with!  Great for layers and even quotes.  I used some washi tape strips, some silver thread, some really old heart brads and some even older chipboard stars.  I heat embossed them with silver powder.  I stamped some hearts and gave them some color with silver metallic paint.  I really just went through my stash and pulled things that might work and started adding them.  I love when I can make old things look new!  Oh, those little metal words are from Walmart!  Random find :)

I even used old Thickers for my title.  Love using up that stash.


A close up of lots of things...heat embossed heart (that was so fun to do!), tape, metallic silver paint...and I outlined the hearts, too, with black pen.


I heat embossed this arrow stamp, too.  It's from Glitz and I use it all the time!  Doesn't that embossed glitter give such awesome texture?


I just love mixed media!  Paint, mist, gesso, stamping...and embossing powder.  I love that it's messy and random.  I love that you really can't mess it up.  So fun and freeing to just get ink all over your hands and underneath your fingernails...haha! :D


A really nice close up of the silver thread and the Color Magic paper...You simply spray and then wipe over with a paper towel.  The white part shines through and the effect is just awesome.


You should definitely hop on over and check out what the other design team members created!  Upload your layout to be eligible to win a great prize!

Have a great weekend, and thanks for visiting me today :)

Tuesday, May 27, 2014

Shiny Gold with My Mind's Eye!

Hello there!  My latest scrappy obsession is definitely the shiny gold trend. I just love the sparkle and shine it gives! The new Necessities collections from My Mind's Eye are just full of metallics.  I created this layout for the blog last week.  You can see the post HERE.

I pulled out the gold Metallic collection paired it with the gorgeous Market Street Ashbury Heights line. They work so well together. I started with the “Word Wood” paper from the Necessities Wood line and did some heat embossing. I wanted more gold sparkle, so I used a lined stamp and embossed with gold powder. I like to jazz up my backgrounds with stamps or paints these days, and this was a nice way to add some sparkle to the background. The metallic vellum is just to die for! I used it as a patterned paper and mixed it in with my layers. There is even sparkly gold decorative tape…I just couldn’t get enough of that! I added to the top and bottom of my layout. Lastly, the large Metallic Monogram Alphas are so versatile. You can see how they can be used here on a layout pretty easily.


Here you can really see the shine! I say the shinier, the better. And isn’t that little jar so cute? I wanted to create the effect of little bits floating up out of it, so I used enamel dots to create that effect. I dug back into my Collectable goodies and used a stamp I had never used before. I stamped it onto a piece of transparency paper and cut it out. That makes it a lot easier to place it wherever I want it without having to actually stamp it underneath layers or on top of a photo.


Eeeek! More glittery gold! If you haven’t tried heat embossing, I highly recommend you do. It’s not as hard as you may think, and you can see how awesome the result is! I added in some gold thread as well. The decorative brads are amazing, as always! They’re a fun way to add some color and texture to your page.


The flair pins are another fun way to add pops of color. They can also be a part of your title since many of them have words or sentiments on them. I layered mine here, near that cute mason jar.


I’m very excited to dig more into these metallic collections. There are several color schemes, and they all sparkle and shine! I hope you are inspired to play around with them…I just know you’ll love them!

Thanks for stopping by today!

Monday, May 26, 2014

Mom & Daughter Selfie / Chickaniddy Crafts

Hey there, everyone!  Today I'm sharing a sweet layout I created for Chickaniddy Crafts.  It's a Mom/Daughter page, and I had lots of fun with it.   I couldn't wait to scrap this fun photo of me, my mom and my little sister.  My mom just hates to have her picture taken, but thanks to the iPhone, selfies are a fun way to get her in the frame :)  My sister and I pretty much squished her face in between ours to get a picture with her...haha!  Gotta love our moms!

I combined the two gorgeous Chickaniddy collections Date Night and Twirly Girly to create this layout.  First, I cut this heart file on my Silhouette Cameo.  I went through all the patterned papers and chose some from both lines that gave me a variety of fun colors.  I backed each heart with those papers.  I added a little bit of watercolor in green and blue to my background to add a bit more of those colors around the page.  There is just a small amount of the light blue in the Date Night collection, so I wanted to play that color up more.


I mixed up the alphas for my title and outlined the pink ones with a black pen to make them pop a little bit more.


I love all the labels and tags in these collections...they're perfect for adding a sentiment, journaling or even the date.  They're also great for layering, like I did with this yellow sticker.  I threw in some polka dotted washi tape from my stash here.


Another fun way to mix up patterns and colors is layering.  I did that beneath my photo and then raised it up using pop dots.  That made it easy to layer in some tangled thread.  That's another way to add color, and in this case, more of that pretty light blue.


I used one of the die cut hearts behind my "selfie" title.  I watercolored it green and yellow to make the blue title stand out a little more.  And I know that reddish-pink paper says "Baby Shower" on it, but it didn't matter to me.  That gorgeous color just had to be on this layout :)


Something I learned creating this layout and it can be a tip to all of you...don't be afraid to add your own pops of color if there isn't a lot of it in the collection you're working with.  I really wanted more of that light blue, so I added paint and thread.  That way it evened out all over the page.  So don't feel limited...just get creative!

Thanks for stopping by, and have a great day!

Supplies Used:
Date Night: DN140S03 Downtown Paper, DN140S08 Wallflower Paper, DN14EB01 Alpha Stickers, DN14EB04 Mini Sticker Tags; Twirly Girly: TG140S02 Birthday Girl Paper, TG140S10 Grandma's Quilt Paper, TG140S11 Never Grow Up Paper, TG140S08 Keepsakes Paper, TG140S08 Itty Bitty Ballerina Paper, TG140S12 Piggy Tails Paper, TG14EB01 Alpha Stickers, TG14EB05 Mini Sticker Sentiments, TG140EB07 Enamel Hearts, TG14EB06 Brads; Other: Cardstock, Watercolors, Technique Tuesday Stamp, Studio G Stamp, StazOn Ink, Stampendous Ink, Black Sharpie Pen, Smash Date Stamp, Thread, Silhouette Cameo, Recollections Washi Tape, Martha Stewart Heart Punch.

Sunday, May 25, 2014

Creative Scrappers #269 + a sale!

Good Sunday morning, friends!  Today is reveal day over at Creative Scrappers, and we have a really cool and fun sketch for you to play with.  This is last reveal for the current design team.  I will miss seeing the work of the talented ladies whose term is ending, but at the same time, I'm excited to see what the new girls have in store!  I'm quite thrilled to be staying on the team for a third term :D

So here's the newest sketch...I love all the squares and grid design.


Here's my layout.  I used the DIY Boutique collection from Simple Stories...omg!  It's amazing if you love super bright colors.  There are so many coordinating stickers...I spread them all out in front of me and I just was overwhelmed at how cute everything is!  These gorgeous colors are right up my alley.  The frames and smaller pieces in the collection were perfect for this sketch!


I love how the colors pop right off the page against the black.  I love the brads, stickers and enamel dots in this line!  There are even clear black and white stickers...like the "Photo Op" one on my photo.


I inked some white Thickers for my 20 part, cut "year" with my Cameo and used stickers from the collection for "reunion."  Outlining with a black pen makes it stand out a little more.


I added some hand stitching here and there for more interest and pops of color.  I just love layouts where I can use all the colors of the rainbow.


This blue is my favorite color.  I just love how this all turned out :)


Make sure you check out what the rest of the team created using this sketch, and you can also see more layout created by the My Creative Scrapbook team as well.  Be sure to upload your layout HERE on the blog for your chance to win a prize from My Creative Scrapbook!

Also, if you haven't heard...My Scraps and More is having a huge Memorial Day Sale!  Check it out below.  Visit the STORE HERE for lots of scrappy goodies!


Thanks for stopping by!

Thursday, May 22, 2014

A new use for feet...

What a crazy title, right?!  Haha!  Let me explain.... 

My little Reesie just loves to use her feet whenever she can.  On this day she made herself quite comfy at the end of the couch and used her feet propped up to hold her book.  She gathered pillows to put behind her back and everything.  I was impressed, so naturally I took some pictures :)

I created this based on an awesome layout by one of our My Scraps Members (ScrapMomof2).  I lifted her page for our Friday Favorite challenge last week.  We both used the American Crafts Plus One collection.  I used mostly barcode strips to create the border, and then I used my Tiny Attacher and a stitch stamp over it.  I added layers of paper, more stamps and washi tape.  Lastly, I embellished with some rub-ons, stickers, diecuts and thread.


Something as simple as a pop dot can change the whole look of a layout.  I loved this globe die cut.  Since she was reading, it just reminded me of knowledge and learning.  I remember going to the library as a little girl and seeing this huge globe there.  So globes remind me of books :)  Anyway, I used gelatos (dry) to color it.  I just smudged it with my finger.  I colored the gold base with a metallic gold pen.


Thickers!  And bright pink ones at that....LOVE!


I added in pops of orange here and there.  I think it goes nicely with all the other bright colors.


I would love to see you join us over on the boards.  You can just jump right in with our challenges and have a great time with us!  Go HERE to check it all out.

Thanks for stopping by today!

Monday, May 19, 2014

It's Just Her Thing

Happy Monday, friends!  Today is very busy for me...I'm teaching three classes at the gym today, and I've got tons of housework to catch up on.  My husband was out of town on business last week, so I'm neck deep in laundry...ugh.  I needed to take a little break, so I thought I'd share a layout I created for My Scraps and More a few weeks ago.  It was for a Throwback Thursday challenge...to use a collection at least two years old and to create your own background on plain cardstock.

I used the For the Record 2 collection from Echo Park, and I used stencils, Dylusions spray and stamps to created a unique pattern on my white cardstock.


I think my two favorite things about this layout is how the yellow sunburst turned out and these alphas!  I used sandpaper over them to give them a faded and scratchy look.  Very cool effect, I think.


I like stamping onto transparency paper.  This was you can cut it out and place it where you want.  This arrow wouldn't have stamped very well over this thread, so with it being on transparency paper I'm able to put it wherever.  I added pop dots to that sticker, which I layered over another sticker.  And these fun bling brads are awesome!


More layers with bits and pieces from the collection...I still have some left over and will hopefully dig into it again soon!


Thanks so much for stopping by today....enjoy your Monday!

Friday, May 16, 2014

My Scraps Sketch #81

Happy Friday, friends!  I have a new layout to share today based on the newest sketch over at My Scraps and More.  It just went up, so you have plenty of time to play with it!  It has a lot of possibilities with the number of photos and embellishments.  You could also use some Project Life cards on this one.  Check it out!


I have SO much American Crafts stuff scattered all over my scrap cave!  I believe this is from Polka Dot Party...I just love the soft colors in it.  This came together pretty quickly...just lots of squares and layering.  The embellishments were fun to add at the end.  These photos were taken one random day while we were stuck waiting on the doctor to come in.


Fun stickers and brads here...I also used an MME frame stamp.  I stamped it on to transparency paper and then cut it out so I could place it where I wanted.


Tangled thread....oh, how I love thee :)


Sweet and simple...and I just love how pop dots can change the entire look of the layout.


Be sure to check out the rest of the Design Teams' layouts and upload yours!  Can't wait to see how you interpret this sketch :)

Thanks for stopping by!

Thursday, May 15, 2014

New Creative Scrappers Design Team!

I'm so excited to share that I'm continuing on for another term with Creative Scrappers!  I'm just tickled pink to be a part of this amazing team :)  Thank you to Kristine for having me again. I can't wait to get started with some new sketches!!

Here is the brand new Design Team:


You still have plenty of time to play with Sketch #268...you could win an awesome prize from My Creative Scrapbook!

Have a GREAT day!

Tuesday, May 13, 2014

Chase Me! / My Scraps & More

Hey there, and Happy Tuesday :)  Today I'm sharing the final layout I created for the April Sketchathon over at My Scraps last month.  I never got around to posting this one or the sketch I created to go with it....so here it is!

I challenged my self to use some purple in this one.  I think that's one of the hardest colors to coordinate because of the variations of shades. But since there was purple in my photos, and I really liked the brightness of them, I didn't want to print them in black and white.  So I wanted to see how I could make it work.  I pulled out some Crate Paper and Studio Calico goodies to get started.

The background is CP, and the other patterned paper layers are SC.  I really like how it turned out...the blues, greens and purples work well together, I think.  I used gelatos to create the large circles.  They smudge and smear so well, and they're just plain fun :)  I added touches of shiny gold glitter here and there, too.


Check out all this dimension!  I didn't even plan this.  I raised the photo up, and then layered the cord under it.  Later, I decided to add my title there, and it wasn't easy to attach it at this raised angle.  But with a little glue, I made it stick.  It's so high...I love it.  I cut it on white cardstock and used gelatos to color it blue.


Clear butterflies, stickers, stamps and thread make a great combo :)  Oh, and some gold metallic paint, too.


I used a Tim Holtz stencil with gold metallic paint...in real life it is shiny and looks neat.


I painted this fun wooden frame and then went over it with acrylic glitter paint.  Love how it looks messy and sprinkled.


Here's the sketch I created for this challenge:


Don't be afraid to scrap a hard color...you just have to get creative and search for the products that will help you go with it.  And I used to think your papers had to match the colors in the photo to a tee, but that's not the case.  You can totally use different shades...I think it's the amount in which you use as well as how you embellish.  There's always a way to make it work.

Be sure to check out the awesome My Scraps store for any and all things scrappy!  Audrey is wonderful....great service and fast shipping!

Thanks so much for stopping by!

Sunday, May 11, 2014

Creative Scrappers #268

Happy Mother's Day to all you moms out there!  Hope you're having a great weekend.  It's time for another awesome reveal at Creative Scrappers!  I'm so in love with this one...all these circles are so fun!  I love these sketches so much because they give me ideas I wouldn't normally come up with, I think.  Check this one out...


I have to say that I just love how this layout turned out.  I pulled out the older Sketchbook line from American Crafts and went to work with this cute summer photo of my husband and baby girl.  I didn't originally intend for my circles to overlap, but you know how things change when your creating a page.  I just went with it.  I added some gelato circles and then traced some with a black pen.  Later, I decided to add some stamping.  It was really just an "add as I go" type of page.  I even went through my really OLD stash drawer and found an old crystal bling circle.  I cut it in half and used it around the photo.


I cut a few messy circles on my Cameo to go around my circles, and then I just went around the page and added brads, flair and stickers.


I added some silver glitter paint to these white Thickers for some sparkle.  I also cut this cool checkered circle out of vellum...it really was just an experiment and I wound up using it :)  I love all the layers under the photo!


This blue is just gorgeous, and I love the pinks and yellows against it.


Bling and stamps here....I like to stamp on transparency paper and then cut it out.  It's much easier to put the stamp where you want it when you're trying to layer it....especially after you've taped everything down and can't fit the stamp under it all...haha.


Be sure to check out the rest of the Design Team's layouts...lots of fun inspiration over on the Creative Scrappers blog today!

Thanks for stopping by!

Thursday, May 8, 2014

Chalk Studio 2 / MME / A Sides vs. B Sides

Hey there, everyone!  Happy Thursday :)

Today I'm sharing two layouts I created for My Mind's Eye this month.  They went up on the blog a few days ago HERE.  I really love the Chalk Studio 2 collection, and it's very cool how the A sides of the paper are so different from the B sides.  I decided to create two completely opposite layouts to showcase the versatility of the collection.

I also tied in the Here is Happy Record It collection...the clear overlays are AMAZING!!  I used them on both pages in different ways.

This first layout uses the B sides mostly.  Very pretty aquas, reddish-pinks and yellow-golds.  I tied in the black elements by using the black chipboard frames, stamps, tags and stickers.  I used two of the overlays...one right on top of my photo.

I gessoed out some of the background and added lots of mist and watercolor to create a messy look.  I threw in some modeling paste over a stencil, some decorative tapes and stamping.  It was just random placement at first, but once I had my papers and photo in place, I added more where needed.


Lots of layering here.  I love tracing over the dry modeling paste texture with a black pen...it really makes it pop.


Puffy stickers....yes!  I used this black enamel arrow from the Cupid's Arrow line.  I used a black Sharpie on the overlay to create a stitched edge.


A great shot of the watercolors and paste texture here...along with a sticker and some thread.


More layers, thread and enamel dots.  I know you can totally see my dried glue here, but from the straight angle you can't see it.


Okay...on to the next layout....this one uses mostly the A sides of the papers.  All black chalkboard elements.  The papers backing the photo are from Here is Happy.  The overlay on the right was backed with patterned paper to make the white color stand out.  I punched the "Yeah, I did that" out of a PL card and used it as an embellishment.  I used a colored pencil to give some yellow tint to the chipboard stars, the SMILE at the top and the camera at the bottom.  Since this page is about The Walking Dead, I wanted it  messy with splatters, so that's where the aqua acrylic paint came in.

My friend Jennifer and I met these cast members at Megacon in Orlando back in March. Yes, we are total geeks!  Haha!  It was AWESOME!  I only wish Norman Reedus or Andrew Lincoln would've been there.....omg!


I used pop dots underneath the chipboard stars here...I love the depth it created.


This arrow was from a random Cameo cut that I did for another project a while ago.  I made it work here.


I LOVE these overlays...so many ways to use them!  And backing it with another color would give it a totally different vibe.  I popped it up so I could throw in enamel dots and thread under it.


Lots of decorative tape here, along with chipboard and stickers.


I hope this inspires you to give both sides of the patterned papers a try...you can get totally opposite looks from one collection if you get creative.

Thanks so much for stopping by today!