Sunday, August 30, 2015

Love You Reesie Cup / Hip Kit Club

Happy Sunday, friends!  I have another layout for Hip Kit Club to share with you today.  I'm still using the beautiful 2015 August Hip Kits...I just can't get enough of them!  I wanted to play around with the Dylusions paints that are included in the Color Kit this month.  You get the Lemon Zest and Bubblegum Pink colors, and they are super bright!  I was experimenting with them when I came across a fun technique.  I have no idea if another crafter has done this before, but to me it felt like a new discovery!

I used my circle mini-ink blending tool and dabbed it in both colors of paint--one color on each side.  Then I pressed it down onto the paper and twisted it.  Then I spritzed some water directly onto the foam applicator and smushed and twisted again.  I got these beautiful circles as the result.  The yellow and pink blended together and created a bit of an orange color while still showing the pink and yellow.  Very pretty and a really fun technique!  I also used the exclusive circle stencil from the Color Kit.  I show exactly how I did this in my process video down below.


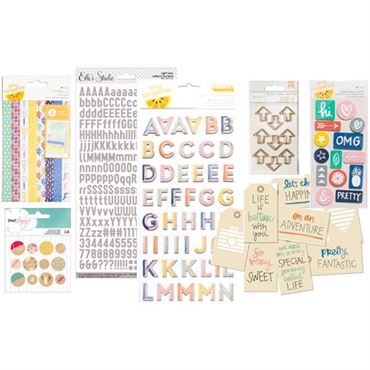
I did add some white gesso down first since I was playing on patterned paper.  I also added some teal spray after the paint dried.  I used my sewing machine to stitch a big messy heart behind all of the layers.  Down here at the bottom I combined the wood grain Thickers with some of the Pinkfresh Studio script alpha stickers, which are both in the Project Life Kit.  That cute heart is from Freckled Fawn (also from the PL Kit).


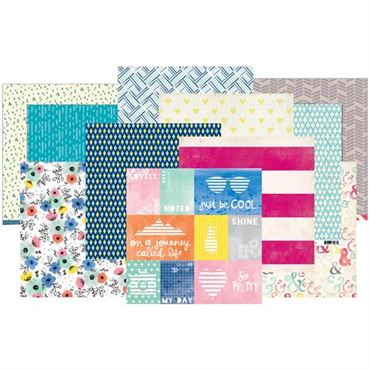
I did pull the chipboard frame with the triangles on it (the bottom layer here) from the April Hip Kits.  It matched this background paper perfectly and I still had it in my stash, so I decided to use it.  I layered some Dear Lizzy chipboard with this cute Crate Paper camera.  That felt heart, enamel dots and sequin is also CP.  I love that some of the FF glitter hearts are open in the center!


Here's the right side of the photo.  I fussy cut that big messy black and blue heart from one of the Pinkfresh Studio papers and layered a Dear Lizzy chipboard piece on top of it with some tangled thread.  See how the paints blended together in the circles?  Love it!


Here's a great close-up of the circles.  You can see where I pressed and twisted and then added more water and just "stamped" it down.  You can get a few different looks using the same tool depending on how much water or how much paint you add.


Here's the process video showing how I created this layout.  I hope you enjoy it!


Thank you so much for stopping by today!  Please let me know if you have any questions about Hip Kit Club or anything else!  Have a great day :)
 

Friday, August 28, 2015

Life is Good / My Scraps & More

Happy Friday, everyone!  Today I'm sharing a layout made using Sketch #112 over on the My Scraps Sketch Blog.  The amazingly talented Gina Lideros designed it, and I had an absolute blast designing with it!  Check it out and you can get the free cut file to help you create this if you have a die cutting machine.

I used the beautiful Pink Paislee Citrus Bliss line and a fun photo of me enjoying a fruity beverage in Las Vegas :)  I backed each hexagon with a different patterned paper and then did a bit of gelato work on top of that.  I added splatters of ink in a few colors and did some gold machine stitching around each hexagon.  I really love how it all turned out!


Aren't these colors just yummy?!  I love these fun puffy stickers.  I had to use them for my title.  I love how the light aqua looks against the orange, and that lemon yellow is so pretty!


This collection has some really fun chipboard and die cut pieces.  I couldn't wait to use this picture with these goodies...I need to drink more fruity beverages just so I can scrap them with this collection...haha :D


I couldn't resist using this adorable flamingo, and I had to add a pop of orange with the thread.  I really love how the gold stitching turned out.  It took a while to go around every shape, but it was worth it, I think.


You can check out my process video of this layout if you're interested in seeing how it all came together.  I hope you enjoy and get some inspiration!


Thanks so much for stopping by today!  Be sure to join us for the Sketch challenge!

Have a great day!

Thursday, August 27, 2015

Happiness is You / My Mind's Eye

Hey there, friends!  Today I'm sharing my latest layout for My Mind's Eye.  I'm loving the new My Colors Cardstocks from MME, and I pulled out some of this gorgeous yellow Glimmer cardstock.  It's called Sunglow, and it coordinated perfectly with the Now & Then Milo collection.  I found this beautiful cut file in the Silhouette Store and used several patterned papers to back the eye-shaped open spots.  I did a little gelato work on the background to show through the diamond shapes.

I kept the embellishing to a minimum so it wouldn't compete with the patterned papers.  I used a few chipboard pieces and a few stickers.


Once I had all the patterned papers adhered, I popped the entire shape up with pop dots.  I love the dimension and the shadowing created from that height.  I added a few chipboard pieces underneath the shape and also a bit of tangled thread.


Here's another angle of the design.  Backing die cuts is such a fun technqiue, and it's really easy once you decide on the die cut you want.  I love the silvers mixed in with this collection...so pretty.


I used my pearlescent watercolors and a small brush and painted "you" and then just cut it out.  I love doing this, and it's a fun way to make a unique title.


Thanks so much for stopping by today!  I am looking forward to working with the new MME collections...you can check them all out HERE.

Have a great day!

Tuesday, August 25, 2015

Love This Lazy Day / The Cut Shoppe

Happy Tuesday, friends!  I have a new layout to share with you today for The Cut Shoppe.  This page features two awesome cut files:  Get to the Point and A Banner Day.  Those arrows are very popular these days!  I've seen lots of you awesome scrappers using this file already, and the projects inspired me to use it as well.


I shrunk the arrows down to a smaller scale and used a small circle photo in the center of them.  I actually began this layout without a photo.  I used that Basic Grey paper as my background first thing and didn't know what kind of layout it would turn into.  Surprise...it's a Summer page!

It took many turns and had many ups and downs along the way.  I did back every arrow with patterned papers from American Crafts Rise & Shine and Echo Park's I Love Sunshine.  Once I had a rainbow theme going on, I knew I had to make a bright and summery layout.  I ran into a bit of frustration with adding my inks and sprays behind the photo, but I kept working at until I was satisfied.


I knew I had to use this "Love" banner as part of my title, so I cut it big enough to stretch from the photo to the edge of the page.  I traced the edges with black pen and then stitched through it.  I also traced several of the arrows and added black lines on some of them just to add more pops of black.  My three flair buttons are from A Flair For Buttons.


I used stickers and chipboard pieces from both AC and EP collections.  I do like how the rainbow colors look against the black and white background.  It's definitely different than my usual pool layouts :)


I added in a few stamps around the page as well.  The papers behind my photo are from the AC Sketchbook collection as well as Echo Park.


Here's one last look at those awesome arrows...this cut file is definitely one of my favorites!


Here's my process video of how this layout came together...I hope you enjoy!


Thanks so much for stopping by today!

Sunday, August 23, 2015

Happy Day Fun / Hip Kit Club

Happy Sunday!  I'm just popping in today to share my latest layout for the Hip Kit Club using the 2015 August Hip Kits.  I have to say that this was probably the fastest layout I've done in a really long time.  I owe it all to this gorgeous Pinkfresh Studio background paper that comes in the Paper Kit.  The circular design really helps to create an easy place for the photos to go...which is somewhere inside the middle.  I decided to punch four small photos into circles and place them around the confetti circle.  To enhance the circle idea, I machine stitched a few times around the page with grey thread.


Although this page came together super quick, it is one of my favorites.  I loved going around the edges and placing fun embellishments down.  I used some of the Crate Paper felt hearts (which I stitched through with gold thread), one of the flair buttons from A Flair For Buttons, and some of the Pinkfresh Studio wood veneer hearts and puffy heart stickers.


My title area is made up of some of the Dear Lizzy Fine & Dandy pieces...the chipboard sticker and some of the washi tape roll.  I used some of the charcoal cardstock to cut "fun" on my Cameo.


Here's one more close-up of the bottom left area.  I also did some gold stitching right on to the photos for a little more texture and interest.


I really love the result of this design...it was fun and easy, and it's really bright and fun.  I did film myself creating this page, so here's the process video if you'd like to see it.  I hope you enjoy and get some ideas on how to use this fun background paper!


Thanks so much for stopping by today...make sure you check out Hip Kit Club and get your September kits reserved...they're gorgeous!

Have a great day!

Friday, August 21, 2015

Behind the Curtain / My Scraps & More

Hey friends!  I'm sharing the layout I created for last week's Throwback Thursday challenge over on the My Scraps & More forums.  The challenge was to use papers and embellishments at least two years old and to use something really big on the layout as well as something really small.

I used the Fancy Pants Be Loved line from 2013.  I am loving the trend of hand drawing letters onto patterned paper and then cutting them out.  I roughly drew the letters of my daughter's name in five different papers and then went over most of the background with white gesso.  I added some gelatos in teal and pink and then added some gold Color Shine splatters.  Next, I machine stitched over each letter with different colored thread.


These soft colors are just gorgeous together...and the gold really accents it all.  I added gold stitching in various places, and I also added gold Color Shine to three of the smaller fussy cut hearts.  I pulled some word and phrase stickers from my stash to add around the page.


My "something small" was the tiny title.  I used the alpha stickers from the collection.  I also added some tissue paper behind the photos as well as some tangled thread.


I fussy cut these chevron arrows from one of the 12x12 patterned papers and then stitched through them.  I brought in some grey and white striped washi tape from my stash to add a bit of interest to the sides of the photos.


Here's another look at the fussy cutting and beautiful gold stitching.  I love mixing up the straight and zig zag stitching.


The last thing I added to the layout was flair.  I gave them each a little gold next to sit in.  I love doing this to add texture, interest and a pop of color.


You can check out my process video if you'd like to see how I put this page together from start to finish.  I hope you enjoy!


Thanks so much for stopping by!  Have a great day!

Thursday, August 20, 2015

Hello Hello Hi / My Mind's Eye

Hey friends, and Happy Thursday!  I'm here to share my latest layout for My Mind's Eye with you today.  I've been having a ball creating with the new MME My Colors Cardstock lately.  There are five different styles and tons of beautiful colors.  I used the Canvas textured cardstock to create all of these fun die cuts on my Silhouette Cameo.  I used four different colors to cut these fun "hello" speech bubbles to layer all around my photo.

I used embellishments from the Now & Then Dorothy collection.  I highly recommend this cardstock for die cutting...it's a wonderful quality and it cut very smoothly.  I kept this layout very clean with no mixed media (I know...a shock for me...haha!).  I only used a few spray inks to add some splatter droplets to the background paper.  I just centered my photo and then placed all the die cuts where I wanted them to frame the picture.  I layered a few 3x4 cards behind the picture and then came in with stickers, brads, chipboard, enamel shapes and some thread.


Here you can see the awesome texture of the cardstock...it really is beautiful.  I found these speech bubbles in the Silhouette store if you're interested in them.  I added this cute "happy day" chipboard piece and machine stitched through it.  My machine actually got jammed (something it has been doing a lot lately) and I had to cover up the mess with that cute enamel heart.  Always be cautious when stitching through chipboard!


I love how these die cuts look layered on top of each other and the open spaces they leave.  So fun!  I decided not to stitch through this chipboard heart...haha.  I just added Paige's name using the "Celebrate" Alpha & Word Stickers.


Another angle...and some really cute brads.  I've always loved that MME includes beautiful coordinating brads in their collections.


One last close-up...more of the same idea here.  I did use the two positive "hi" cut outs on the page as well.


We have a fun & informative video up on the MME blog explaining all the new cardstocks...check it out!


Thanks so much for stopping in today....have a great day!

Tuesday, August 18, 2015

Always on the Go / Shimmerz

Hey, friends!  I have another bright layout on the Shimmerz blog to share with you today.  I was in the mood for bright yellow when I created this page, and I decided to start with plain white cardstock and my No Yoking Coloringz.  I used it through a stencil at first, and then I just sprayed on some more.  I added in some more Coloringz...Mandarin Mai Tai, Pink Stiletto and Pretty in Pink.

I pulled some embellishments from the Amy Tan Rise & Shine collection from American Crafts and used a few of the clear stickers.  That big piece on the lower right of the photo is a sticker...I love how it blends with these Shimmerz colors perfectly!


I love this photo of my youngest daughter.  It fits her...always running and moving, and barely fitting into the frame of the photo before running off again.  I brought some teal into the mix with this frame and some tangled thread.  I had to add the flair button there....it says Catch the Seconds as They Flash By...so perfect for her and this picture!

I used some of the Lemon Drop Dazzlerz through a small circle stencil here to add a bit of yellow texture.  I just used my finger to smudge it on.  I love how it coordinates perfectly with the No Yoking Coloringz.


Here's a close-up of more of the Shimmerz background.  I added in some splatters of Well Blue Me Down Coloringz and Before Dawn Vibez.  I did some hand stitching on that arrow and added in a flower die cut.


I created this "Go" title with a paint brush and Coloringz.  I just took the lid off and dipped my brush right into the bottle and used it as watercolor.  I painted the word freehand in Mandarin Mai Tai and then added some Pink Stiletto.


One last close up of the bottom...more Dazzlerz and Coloringz.  I love how these bright colors make such an awesome background!  You can do this with any color scheme you want.


I hope this inspires you to create something awesome with your Shimmerz goodies!  As always, you can visit the Shimmerz Paint Store and purchase any of these awesome products!

Products Used:
Coloringz:  No Yoking, Mandarin Mai Tai, Well Blue Me Down, Pink Stilettos, Pretty in Pink
Vibez:  Before Dawn
Dazzlerz:  Lemon Drop

Also, don't forget to check out the Shimmerz Paints TV YouTube channel (and my own personal channel) every Thursday to see our newest video series, Shimmerz Shortz.  They are short tutorial videos explaining the Shimmerz products in detail.  Here are the latest two videos taking a look at the differences between Dazzlerz and Texturez, and then the differences between Spritz and Vibez.


The Shimmerz YouTube channel also has all the videos from our Education Team.  So go check it out!  Thanks so  much for stopping by!!  Have a great day!


Sunday, August 16, 2015

Adventure / Hip Kit Club + September Kits Reveal!

Happy Sunday, friends!!  I have a lot to share with you today.  First up is my first layout for the Hip Kit Club using the 2015 August Hip Kits.  I can't say it enough...they are so so so gorgeous!  It really is difficult to decide what pieces to use first.  I had a great time putting this together using lots of the Dear Lizzy Washi Tape and Pinkfresh Studio goodies!

I started off with some white gesso on my background paper and then used some gelatos and spray inks to create the watercolor effect.  I wanted to bring in the pinks, teals and gold colors from all the papers and embellishments.  I seriously love those acetate triangles from Pinkfresh Studio!  I knew right away I wanted to create a banner with them.  And let's all take a minute to ooooh and aaaahh over those gold script Thickers...


Here you can see the shine a lot better.  I honestly don't see myself ever getting sick of shiny gold on my scrapbook pages.  It's just so pretty!  I used a few pieces of the washi tape roll, some of the Crate Paper Wonder sequins (adhesive on the back!), a Pinkfresh puffy sticker and that awesome yellow flair button from A Flair For Buttons.


You guessed it...tangled thread.  You can see the washi tape up close here.  I stitched over it and added a few enamel dots.  That gold label piece is from Heidi Swapp, and those are in the Project Life Kit.  I used one of the Pinkfresh rubber charms as well.  Here you can also see the watercolor on the background.


Those cute glitter chipboard hearts are from Freckled Fawn, and I layered it with some of the Dear Lizzy chipboard and a felt heart from Crate Paper.  I stitched through my triangle banner since my ATG tape was visible through it.


One more close up of the left side.  Those numbers are from a piece of the washi tape, and that little chevron layer is a Project Life card.


You can check out my process video if you'd like.  It shows how I created this page from start to finish.  Hope it inspires you in some way :)


And now....the REVEAL of the SEPTEMBER HIP KITS!!


You can go ahead and purchase any of these kits right now, so head on over to the Hip Kit Club store and get yours today!  They will start shipping in a few weeks.

Thanks so much for stopping by, and have a great day!