It's the weekend...woo hoo! Only a few more days left of 2017. Crazy! I wanted to share my newest layout for Hip Kit Club with you today. I used the 2017 December Hip Kits, and even though they aren't holiday themed at all, I made this fun Christmas page!
There are lots of holiday colors throughout the products, and I mixed them together to create a Christmas color scheme. I began with one of Irit's gorgeous watercolor papers as my background. I used the Impact font and cut CHRISTMAS out really big using my Cameo. I backed the open letters with various papers from the kit. Once that was done, I added some white gesso over a lot of the background. I wanted to add more color to the background, so I used some pink Shimmerz that came in our Color Kit this month. I mixed in a few more pinks from my stash and added a bit of Gold Color Shine (from a Color Kit a few years ago!).
Look how shiny it all is! So pretty. I love these Thickers...so glittery and gold! I used some of the small light blue Pinkfresh Studio alpha stickers up top here and that little bird is my favorite! It's actually the top part of a Vicki Boutin clip, but I just cut the bird out. I also machine stitched through the title with gold thread.
I had a lot of open "dead" space in my photos...just windows and curtains. So I overlapped a few die cuts and stickers right on top of them. I tucked in some light blue thread and a few enamel dots.
I love using a big title like this. It helps get the design going, and once you have it, it's permanent. That means you have only so many spots to put your photos and embellishments. I like that aspect of this technique because it makes the page come together faster.
That flower cluster is another Vicki Boutin clip that I tucked under the photos. I added some leaves from her die cut pack and some from Crate Paper Good Vibes. I used one of my scalloped border punches and punched a Project Life card to create this little blue border. I also used a few of the Pinkfresh Studio stitched vellum stars. They're perfect for a Christmas page!
I also watered down some white acrylic paint and splattered it around to create the look of "snow." It's pretty subtle, but I like it :)
And one more close up of the bottom cluster area. I love mixing and matching chipboard with flat stickers! Such great dimension!
This was really fun to make, and I love the challenge of creating a holiday page with non-holiday products. You just have to think outside the box! Here's my process video if you'd like to see how I made this from start to finish:
Thanks so much for stopping by, and HAPPY NEW YEAR!
Happy Thursday, friends! I'm back today to share my last project as the SpiegelMom Scraps December Guest Designer. I've had a wonderful time creating with all of Jody's beautiful sequins mixes, and I want to thank her for having me :)
For my final layout, I used sequins from the Peachy Keeny, On Pointe, Lisa’s Starry Night and Painted Gardens
packs. I began with a large star snowflake cut file by Paige Evans. It's called Starkflake. I did a bit of
mixed media work on the background using oil pastels, gelatos and some
Shimmerz sprays. I filled in all the snowflake designs with sequins!
It was a lot of fun, and the end result is fantastic. I totally forgot about my honeymoon photos...haha! We went to Lake Tahoe back in 2000, and we went snow skiing. I wanted to mimic all the white and the colors in my jacket. I used the lines of the cut file to glue down the sequins, and the sparkle factor is just awesome!
I love this color mix...it's so pretty! Once the sequins were dry, I was brave (and crazy) and machine stitched over some of the lines. It worked! I also stitched around the edges using metallic silver thread.
I used the Scotch Tacky Glue to adhere the sequins and it works really great.
I dug into my stash for embellishing. I used some older silver glitter Thickers for my title as well as some Crate Paper Oasis alpha stamps. I used some tissue paper and a few 3x4 cards from an older Hip Kit behind my photo.
I pulled some die cuts from Crate Paper Snow & Cocoa that matched my photo perfectly. I used a few Pinkfresh Studio blue puffy stars as well. I used a few Tim Holtz phrase stickers as well.
I started by lightly tracing the star onto the background with a pencil. I smudged down some clear gesso first and then used a few Prima Oil Pastels to add some color. I just scribbled them on and used my finger to smudge the color around. I also brought in some Shimmerz sprays with some plastic packaging as well as some brush splatters.
This has been such a fun month! Thanks to Jody for having me this month. I highly recommend stocking up on all your sequins with SpiegelMom Scraps. They are amazing!
Here's my video if you'd like to check out how I made this page:
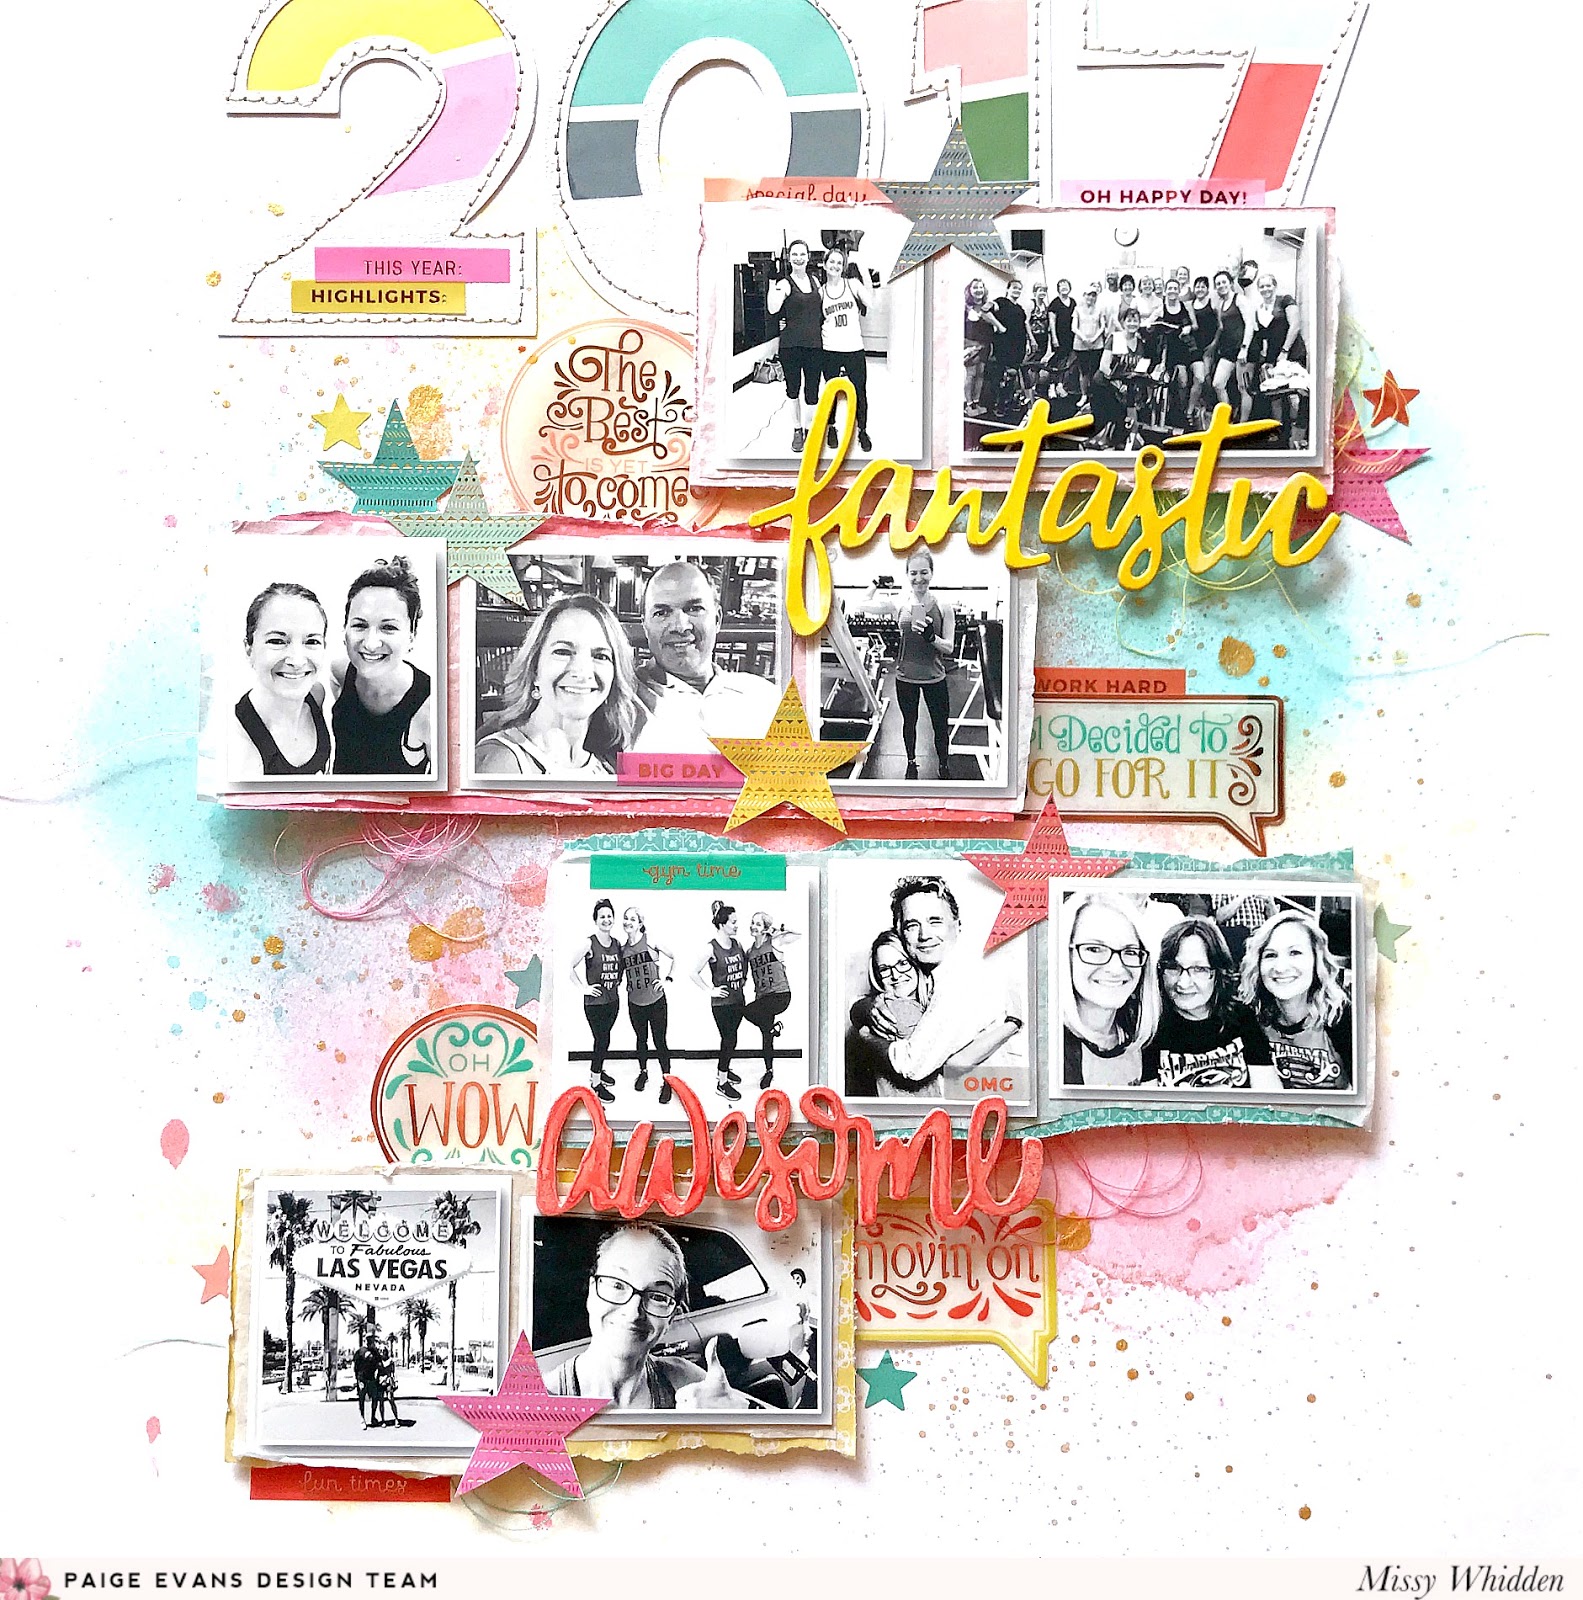
Hello again, friends! I hope you all had a wonderful Christmas. Today I wanted to share my newest layout for the Paige Evans Design Team. For this page I decided to focus on 2017 and
highlight all the big moments that stood out to me and document them
all together. It was a great year and it was fun going through all of my
photos and remembering all the awesome times. I used both the Turn the Page and Take Me Away collections for this as well as the Paige Font cut file designed by Paige. I started by cutting 2017 really large on white cardstock using my Silhouette Cameo. I backed the open spots with Turn the Page Paper 03.
I decided to place it at the top of the layout and run it off the page.
I used a lot of spray inks on the white cardstock background using
plastic packaging to smoosh the color down. I covered a lot of the
background since I had so many photos that would take up a lot of room. I
backed the photo strips with papers from the Turn the Page 6x6 Paper Pad and embellished with fussy cut stars, some stickers from Paige’s 30-page #StickerBook and some Take Me Away Chipboard Stickers.
I added some tissue paper and adhesive foam behind my photos to create
some dimension. I fussy cut those little stars from a Turn the Page 6x6 Paper Pad sheet
and added them around the page - some are on top of photos and some I
tucked under. I wanted 2017 to be my title, but I also wanted a few
subtitles. I added “fantastic” from the Take Me Away Chipboard Stickers -
I love the pop of yellow it gives and it reinforces how great of a year
this was! The foiled speech bubble stickers are from the #StickerBook and
I adhered them to vellum and then fussy cut them. I also used a lot of
the small phrase stickers around the page. Even though they’re geared
toward planners, they were perfect for this layout.
I decided to change the color of this "awesome" chipboard sticker. It
was a cream color, but I wanted it to pop a little more so I covered it
with white acrylic paint and then used some spray inks to add the color.
I love how it turned out!
To add a bit more interest to the large cut file title, I machine
stitched around all the numbers with gold metallic thread. I was so
excited when I found those small “This Year” and “Highlights” stickers
in the #StickerBook - they were meant to go right in that spot!
It was a lot of fun using so many photos on one layout. Creating small photo strips like this is a great way to go, especially if you're doing a timeline idea. I really like the dimension here, and all it takes is a little adhesive foam. I tucked in a bit of colored thread here in there to add some texture and pops of color. And look how pretty that shiny gold foil is on that sticker!
Always look at the images on your papers, like these little stars. They're perfect for fussy cutting. Don't be afraid to cut something out and use it as an embellishment. I love how this chipboard word looks overlapping the photos here.
The stickers in the #StickerBook are so perfect for a page like this. Or a goals page or a page about something you've accomplished. The messages are great, and I was happy to use a few of them on this page.
The planner-type stickers in the #StickerBook are also perfect for this type of layout. I used quite a bit of them for my photos.
I hope this inspires you and gives you some ideas to try for a yearly wrap-up layout. Plus it gives you an excuse to use a bunch of photos...woo hoo! Check out my process video here to see how I did everything.
Thanks so much for stopping by! Have a great day :)
Merry Christmas, everyone! I wanted to jump online here during this busy time and share my newest layout for Hip Kit Club. It's my first page using the 2017 December Hip Kits, and I love how it came together! We're still showing how you can create holiday related pages using non-holiday products. These kits contain several exclusive watercolor designed papers by Irit Landgraf, lots of Vicki Boutin goodies and of course some lovely Shimmerz Paints.
I started with some white cardstock as my base and one of Irit's watercolor papers from the Main Kit. I went through all the FREE December cut files over on the Hip Kit website and found one with these little stars. I copied and pasted a bunch of them and cut them out on Irit's paper. I created a tone-on-tone look with watercolors behind the stars and sort of created the shape of a tree. I used the Shimmerz from this Color Kit this month as well as a few from my stash.
I also layered in some Pinkfresh Studio Puffy Stars that matched perfectly as well as a few Vicki Boutin enamel dots.
I decided to make this a very colorful layout because I don't think Christmas time has to be limited to just red and green. I fussy cut "December" from an exclusive Project Life card and used it as my title. I paired that with "happy" which is a puffy Thicker and a cute Vicki Boutin phrase sticker.
These photos were taken on Christmas Day...she's wearing her Santa shirt :) There were so many colors in the blanket behind her and the chair was dark maroon. I made them black & white to take out all of that. Here I added another phrase sticker and a rainbow row of puffy stars. I used a Crate Paper die cut frame as a layer here...the colors were perfect!
Here's a closer look at the title area. I machine stitched through it with gold thread since I splattered some gold on the background. And you can't have too much gold :)
I hope you are inspired by this in some way...it was a lot of fun to make. And it's a fun challenge to create something holiday related with items that aren't designed for it. I have a video here if you'd like to check it out:
Thanks so much for stopping by, and have a wonderful Christmas!
Happy Friday, everyone! I'm back today with another layout I created for SpiegelMom Scraps as the December Guest Designer. I tried something different for this layout and used sequins behind a cut file. The theme this month is Winter, so I pulled out some photos of Paige in her bear jacket. I knew that Paige Evans has a Geometric Bear cut file in the Silhouette Store, so I had to use it! I cut it on white cardstock and used sequins from four packs: Aquarius, On Pointe, Water Lilies & Peachy Keeny.
I pulled some Shimmerz Paints from my stash in colors that coordinated with the sequins. I created a lot of splatters on the background, and I also used those same colors to back the rest of the bear. I just used a scrap piece of cardstock and made some color swatches with the Shimmerz. Then I cut them out and glued them behind the bear. This makes more sense if you watch how I did it in my video down below :)
I really love how the sequins look here...so pretty and shimmery! To do this, I traced the shapes onto a scrap piece of cardstock. I glued the sequins to that and then placed the bear over it. You can see the dimension here because I added adhesive foam to make it stand up a bit.
You can see here how the cut file is raised up a bit...I love the shadowing that creates! I added a bit of aqua and grey thread in a few places to add to the messy feel of the background.
I love how the splatters turned out...it reminds me of snowy confetti (if that's even a thing...haha). I added some tissue paper and adhesive foam behind my photos as well as a few fussy cut stars. Those were from a Pinkfresh Studio paper. I fussy cut this little polar bear from a Crate Paper Snow & Cocoa die cut, and my title is from a sheet of very old and cheap white alpha stickers. I curved it along the bear's back.
On this side I added some pink thread. That "warm & cozy" sticker is from last year's November Hip Kit Club kit.
I wanted to give the bear something to "walk on," so I machine stitched some ground for him. I used metallic gold thread and I just did a straight stitch back and forth. I wrote my journaling under it and then added the date.
Here's another look at all those splatters...so pretty! I used the nozzles of the sprays and a brush.
One last close-up...look at those shiny sequins! So pretty!
I hope you enjoyed this....it was a little different for me, but I really love how it turned out. I'll be back next week with one more Winter project for SpiegelMom Scraps!
Here's my video:
Thanks so much for stopping by, and have a great day!
Hey friends! Today I have a fun and festive Christmas layout to share for the Shimmerz Education Team. I used several Shimmerz products to create this pretty background. All of my papers and embellishments are from Pinkfresh Studio and a few holiday Hip Kit Club kits. I was first inspired by a few patterned papers that had those cute stockings and houses on them. I fussy cut a lot of them out and decided to create some clusters around my photo. I wanted to use lots of traditional Christmas colors from the papers, but I also wanted to bring in some blue. That's where the Shimmerz come in!
I used Bazzill Marshmallow cardstock as my base, and it's pretty smooth and thick. I added some Inklingz Me & Blue to some Paste-eez Salt of the Earth. It created a pretty light blue paste, and I smudged it all over the background using a palette knife. I sprinkled in some Vibez Jeni B Bleu and Snow Way Man to add a few different blue shades. Once that dried I splattered on some Inklingz Green Goddess and Miner Miner 49er. The mix of these colors was perfect for these papers. I popped up the stockings with some adhesive foam for some dimension.
Here you can see the pretty blend of the background colors. I used some Pinkfresh chipboard, die cuts and puffy stickers here, and that cute flair button is from last year's November Hip Kit. I used the Paige Evans Folk Art Christmas Tree cut file to cut this cute tree...I cut it on vellum and layered it behind everything. I wanted some detail back there without being too distracting, so vellum was perfect.
Here's a tip when you're using Inklingz or Creameez. You can really water it down and make the paint thin or you can add less water and thicken it up. If you look at the gold splatters here, you can see some are bigger and more sheer while others are smaller and more dimensional. Two different looks with the same paint...just change the amount of water you add. To add more green here, I used a brush to spread around some Coloringz Keep Palm.
I used a few Pinkfresh wood buttons and enamel dots in a few places.
Here you can see the differences in the gold splatters. I love the dimension of the smaller dots!
Here's one last close-up of all the pretty colors :)
I hope this inspires you in some way. Don't be afraid to mix and match your Shimmerz...even if they're completely different products. You can get some really fun colors and textures by combining things. Be sure to check out my video here to see how I created this background:
Thanks so much for stopping by! Have a very Merry Christmas!
Supplies Used:
Inklingz--Me & Blue, Miner Miner 49er, Green Goddess
Happy Monday, friends! One week until Christmas...wow! Today I wanted to share another layout I created for Hip Kit Club using the 2017 November Hip Kits. I just love this beautiful tree cut file...you can find it on the Hip Kit website under the Cut Files tab. It was one of the FREE ones for our 12 Days of Giving.
I originally wanted to use the tree as a mask after cutting it out on white cardstock. I used the Distress Oxides from the Color Kit and a blending tool to smudge the ink over the die cut. I wanted to have blended and faded colors around the white negative space under the tree. I also used a gold ink pad from my stash down at the bottom and sprayed some Gold Color Shine at the top. Once I removed the tree, I fell in love with how it looked! And I also loved how the actual cut file looked with all the color. I decided to use it and just overlapped it with the white "shadow." I really love how it turned out.
Before gluing anything down, I machine stitched through all the loops of the tree for some extra gold shine. I mixed and matched for my title here. I cut "Merry" from a Project Life card and "ridin'" is from the exclusive Hip Kit gold puffy alpha sticker sheet. I went with this title since we were riding around in a golf cart...enjoying the heat...one week before Christmas...haha! I also added some of the exclusive sequins around the page.
So many little things here...some exclusive wood veneer pieces, some exclusive washi tape hearts, a Crate Paper sticker and "Magical Memories" was fussy cut from the exclusive cut-apart sheet.
I used a few Project Life cards under my photo for layering as well as some of the Crate Paper chipboard frames. I love this one with all the gold glitter! I also scattered a few enamel dots around the page and added some aqua thread. The flower sticker is from the American Crafts Sweater Weather sticker sheet.
I couldn't resist using the "Warm Wishes" exclusive flair since it was 80 degrees :) I layered a circle die cut under it and added a few stickers around it.
I love how pretty the Gold Color Shine looks here...bright and shiny but still nice and subtle.
I had a blast putting this together. The Color Kit made it come together pretty quickly. I hope you're inspired in some way! Here's my process video:
Thanks so much for stopping in, and have a great week!