Wednesday, September 30, 2020

Down at the Lake / Shimmerz Paints

Happy Wednesday, friends!  I'm back today with a new fall mixed media layout for Shimmerz Paints using lots of beautiful Shimmerz goodies :)  I decided to pull out some of my older stash and used the 2016 Simple Stories Hello Fall collection.  I had just the right colors of paint to match the pretty flowers.  I also wanted to use a patterned paper background instead of white cardstock to show that Shimmerz look awesome on anything!

Shimmerz Used:

I started by fussy cutting the flower clusters from a patterned paper.  Once I had them arranged around my photo, I smudged white gesso to the background...mostly on the left side.  I wanted to mimic the photo and create the illusion of a sky and grass.  I used the sprays to create the blue and green areas by spraying them directly to the page and using a brush and a bit of water to help spread around the color.

I love how this green looks with these flowers.  I popped up most of the flower clusters and smudged a bit of white gesso on some of them to distress them a little.
This blue is gorgeous...look at the shimmer.  I decided to create some of my own flowers, so I pulled out an old Fancy Pants stamp and painted them with Shimmerz.  They created some messy circle flowers, which I cut out.  This is an easy way to add something unique to a layout if you're using a lot of patterned paper.  I like to add something "homemade." I wanted to add some sparkle, so I glued down some of the Pinkfresh Studio Essentials Jewels and Crystals, which are kind of like small rhinestones.

I tucked in more of my homemade flowers and also some matching colors of thread.


I used a combo of the Simple Stories alphas with some older gold Thickers to create the title.  I toned down the shine on "the lake" buy smudging some white gesso over the letters.  I also added in a few matching stickers. 

I created a matching cluster to the right of the title area using more of the patterned paper flowers, thread and a homemade flower.
One more just because :)

I hope this inspires you to create a fall layout using Shimmerz!  I really love how this turned out, and it was fun to dig through my Shimmerz stash to find the matching colors for this collection.


Be sure to check out my process video here:


Thanks for stopping by!

Friday, September 25, 2020

Wild and Free / Paige Evans DT

It's the weekend...yay!  Here's my newest layout for the Paige Evans Design TeamI used Paige's gorgeous new Go the Scenic Route collection. I can’t get enough of all the gorgeous rich colors! I also used Paige’s Wild & Free cut file and her Leopard Print Stencil. I went with a rainbow color scheme again because I couldn’t narrow it down…haha. 

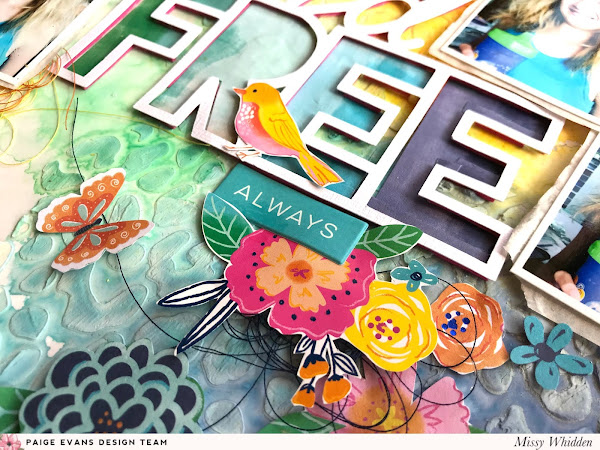
I wanted to create a “wild” theme to match my wild child, so I chose the cut file to use as a large title element. I cut it on textured white cardstock and then traced the letters on Paper 21 and cut them out. I popped the cut file up off the page with adhesive foam and placed the rainbow letters inside each space creating a shadow effect. I used thick smooth white cardstock as the base and I coated it with clear gesso first. I used modeling paste over the Leopard Print Stencil. Once that dried, I used a mix of Distress Oxides and Shimmerz to create matching watercolor areas.

I can never get enough of these beautiful colors!  I love how the leopard print looks with the oxides over it...subtle but still striking.
I added some tissue paper behind my photos and popped them up with some adhesive foam.  I love that the 6x8 Paper Pad gives you the smaller versions of the larger papers.  Perfect for fussy cutting and adding tiny flowers or butterflies!
I'm really loving how these bright colors look against navy blue.  They just pop so nicely. 
The paste creates such a fun and bumpy texture and it’s so neat to watch the colors spread over and around it. I tried to create a tone-on-tone effect with the letters and the background. I fussy cut several smaller butterflies from the 6x8 Paper Pad as well as a cute little bird. I also used several Cardstock Stickers and a flower from the Ephemera Die Cuts.
This here is a mix of chipboard stickers, cardstock stickers, die cuts and fussy cut flowers.  Mixing and matching is my favorite!


I wanted some cute animals on this page and the birds are just gorgeous! I added a few from the Cardstock Stickers right on top of the cut file. The bright colors just pop right off the page. I love the watercolor feel from Paper 21.
I created a small flower cluster down at the bottom on the blue area. These colors show up so nicely against the darker blues. I used a mix of a Cardstock Sticker, a Puffy Phrase Thicker, and several fussy cut flowers from the 6x8 Paper Pad. I finished it off with some dark blue tangled thread.
Here are a few more close-ups of all the details :)


I hope this inspires you in some way.  I honestly can’t get enough of the Go the Scenic Route collection and I am instantly inspired every time I pull it out. If you love rainbows, this collection is perfect and makes it very easy to create with that color scheme. 

 Here's my process video if you'd like to check it out:


Thanks so much for stopping by and have a great day!

Thursday, September 24, 2020

Sweet Sunshine / Hip Kit Club

Happy Thursday, friends!  I'm sharing a new layout for Hip Kit Club today :)  This is my first page featuring the 2020 September Hip Kits.  They are full of fall goodness!  Lots of the Crate Paper Marigold and Pinkfresh Studio Days of Splendor collection...so pretty.  I don't have a lot of typical Fall photos since I live in Florida, so I have to make our outdoor photos during the Fall months work :)

I used this gorgeous teal cardstock for a background.  I added a sliver of a diagonal striped patterned paper over on the left and then smudged down a bunch of white gesso.  I added a hint of color over the gesso using the Lindy's Gang Clam Bake Beige Powder.  It dries very light over white gesso.  I layered a few patterned papers behind the photo and went crazy with cute embellishments :)

These deer are SOOOOO cute!  I used one from the Crate Paper Chipboard Stickers, I fussy cut one from a patterend paper and then one from the Crate Paper sticker book.  I also used a cute little squirrel.  I love how the deer are looking at the photo.  I wanted them to have something to stand on, so I machine stitched them a little spot under their feet :)  I popped up a few of them to create some dimension.
I layered in a fussy cut flower here (from a Pocket Life card), a few of the gold puffy Thickers and some cute camera stickers.  I absolutely love the combo of the gold on top of the teal cardstock...so beautiful!
I fussy cut a few of the large vellum flowers (Amy Tangerine) to use as layers under the photo.  Here you can see the effect of the gesso.  I splattered some gold Jen Hadfield Gold Glitter Spray as well (from an older kit).
I tucked in some tangled pink thread here...I love the touches of pink scattered around the page.  The white splatters are white acrylic paint.  I just watered it down a touch and used a brush to splatter.
I tucked in a few flowers here...the cluster is a Jen Hadfield sticker, and the circle is from Pinkfresh Studio.  I love combining different products from different brands like this!
I think the white splatters look like snow, but I used them on a Fall page anyway...haha.  I love how the white looks on the darker background...always so striking.

Here you can see the dimension from the adhesive foam behind some of the animals.

I love this Sweet sticker...perfect for a title.  I love how it angles up, and the font is so pretty. 

These cute cameras are clear stickers, so I adhered them to white cardstock first and then cut them out.  This way the background doesn't interfere with the colors.

One more just because the deer are so adorable :)

I hope this inspires you today...the September Hip Kits are just beautiful.  I had fun getting out of my normal comfort zone and creating this page.  Usually I'm all about rainbows and summer, but this was fun to make to change things up a bit!

Here's my process video:


Thanks so much for stopping by, and I'll see you again tomorrow with another layout and video!


Tuesday, September 22, 2020

Sprays & Mists Tutorial for Scrap Academy / Everyday Backseat View

Hey, friends!  I'm back today to share another video and layout I created as a guest teacher for Scrap Academy.  I focused on sprays and mists for scrapbooking, and in this video I dive into several different ways they can be used on your projects.  I also share some of my past layouts featuring the different techniques.  I hope you find it helpful if you're just getting into mixed media or find it intimidating.  It really is easy to use them, and it doesn't have to be "a big ol' mess" at all :D


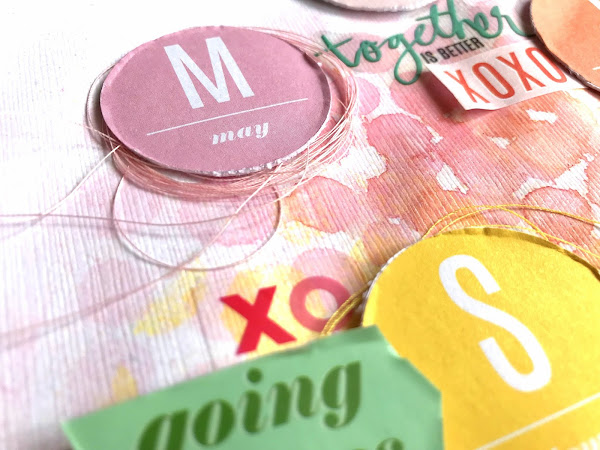
I used a small circle stencil to create this background.  I used textured white cardstock that I coated in clear gesso first.  I used a rainbow variety of Shimmerz sprays over the stencil to create the fun circles on the background.  I was inspired to use circles and these colors when I flipped through an older Heidi Swapp sticker book and found these cute & colorful circle stickers.  After I made the background, I distressed the edges of each circle, added adhesive foam under them and scattered them over the page.  I added some matching colors of sewing thread around a few of them to add some fun texture.

I love that you can see the cardstock's texture through the sprays.  I tried to arrange the circles on the matching section of the background.  I glued them all down and then continued to embellish using more stickers from the sticker book.
I used some older Basic Grey small black alphas for my small title.  I like that it fit perfectly here under the photo and in between some of the circles.  I added a few more stickers and wrote my journaling beneath it using a fine tip Sharpie.
More stickers :)
I used a few random pieces from my stash bucket to layer behind the photo as well as some white tissue paper.
This actually turned out to be a pretty simple page once the background was complete.  I just stuck to the sticker book, and it came together pretty quickly.


I hope this inspires you to try out some sprays & mists on your next layout!  I promise they don't have to be scary, and you don't have to use a lot.  A little can go a long way and make a big impact. The possibilities are endless!

Be sure to check out Scrap Academy for all kinds of videos and projects related to anything and everything scrapbooking.  It's a great place to learn and have fun!

Have a great day!