Thursday, July 31, 2014

Can You Believe This Crazy Hair?

Haha!  Yep...another fun layout to share today about my craziest and wildest child :D  It all starts with her unruly curly hair.  This girl is so full of energy...she never stops!  This hair is perfect for her.

I have been wanting to try something different lately, so I ordered myself a July kit from the Hip Kit Club.  I've made four layouts with it so far!  I'm having lots of fun.  What I like about it is that it includes items I didn't already have in my stash.  This is the first layout I created using the Main Kit, the Color Add-on, and the Stamp Kit.

You can really go a lot of different directions with this kit, so for my first one, I decided to create a rainbow of sorts.  I used the Sweet Cherry Color Shine from Heidi Swapp as a watercolor paint.  It dries very light...pretty much a pink color, so my photo was a perfect match since she's wearing a pink shirt.  I incorporated blue into the mix using this blue frame, and then I added in embellishments using all of those primary colors.


I used a Crafter's Workshop template to create these triangles, and I mixed and matched my title.  I used the blue alphas from the kit, some alpha stamps from my stash, and a Cameo cut using the red paper from the kit.


There are a lot of fun die cuts in the kit from October Afternoon.  I used pop dots on a few of them.  The chipboard stickers are so much fun!


I went crazy with these adorable Simple Stories stamps...all of these mini sentiments are perfect for almost any layout or card.  I added in my own washi tape and thread here and there.


I'll be sharing my other Hip Kit pages throughout the month.  I really am enjoying this kit...if you're looking for a club that will give you variety and bright colors, this is the one!

Thanks for looking, and have a great day!

Tuesday, July 29, 2014

You / My Scraps and More

Hey, friends!  I hope you enjoyed your weekend :)  Today I'm sharing a page I made a few weeks ago for a challenge over on the My Scraps and More boards.  The challenge was to use only one collection (no mixing and matching) and to use several big embellishments from that collection...like big chipboard pieces, banners, dimensional stickers, etc.

I dug through my MME stash and pulled out the Cut & Paste "Adorbs" collection.  Everything on my layout is from that line, with the exception of the pink & white striped washi tape, the clear sentiment stickers, the thread and the background elements.  I started with this beautiful blue and green ombre paper and jazzed it up with some modeling paste and stamps.  I wanted to create a messy and scattered look.  I added some patterned paper layers behind my photos, as well as some pink acrylic paint.  Then I embellished.  I used a few chipboard pieces, several stickers, lots of brads & enamel dots and some washi tape.


Here you can see some of the paste texture and stamping up close.  I added pop dots to this chipboard bubble...I love that it's ombre!


Lots going on here...so much depth and layering.  Dimensional stickers do all the hard work for you...just stick'em and go :)  I love the chipboard frame...I decided to use it as an anchor for all the goodies on top of it instead of putting it on a photo.


I created messy cluster at the bottom of the layout for my title.  I brought the pink paint down there as well as the tape, brads, stickers and enamel dots.  I love clusters!


Thanks so much for stopping by today!  Enjoy your day!

Sunday, July 27, 2014

Creative Scrappers #274

Hey there, scrappy friends :)  It's Sunday, and that means it's time for another awesome sketch reveal over at Creative Scrappers!  I love this sketch...check it out:


As soon as I saw the sketch, I knew exactly which papers I wanted to use.  The Heidi Swapp Favorite Things line is perfect for this!  That rainbow circle paper fits this to a tee, and all the fun enamel arrows and hearts are just meant to go inside the circles.

Instead of using two photos, I only used one.  In the other spot, I created an embellishment using the Heidi Swapp mini stencils and some distress ink.  I LOVE how it turned out!  I added in lots of Jillibean Soup circle sentiment stamps to finish it off.

I did add some thread, washi tape, a HS glitter frame and some watercolors and gelatos on the background.


And for the first time, I just realized I somehow deleted my close ups!  I've been taking my layout photos with my phone, and I think I deleted them by accident before uploading them here.  I don't know what I was thinking....blonde moment!

Anyway, be sure to visit the Creative Scrappers blog to see what the rest of the team created.  You can also enter your layout there for your chance to win a prize from Pinkfresh Studio!

Thanks so much for stopping by today!

Friday, July 25, 2014

Smooching Cheeks / My Scraps & More

Yep, I said smooching cheeks!  Haha!  That's what my layout is all about.  I can't get enough of soft squishy baby cheeks.  This picture of my little Paige is almost three years old, and she's five now.  But she still has these cheeks, and I still have to pry myself away from them most days.  They're just so soft and sweet, and my favorite time to smooch her is first thing in the morning.  I'm a crazy mom, I know :D

Anyway....back on topic.  I created this layout for a Got Talent Challenge last week over at My Scraps and More.  The challenge was to use a busy background, create a complete sentence for the title, and to mix up the alphas.  I used the Capture Life collection from Echo Park.  I'm in love with this line....holy cow is it gorgeous!  I picked this very busy and loud patterned paper for my background, but I altered it up a bit.  I added gesso and then some watercolors and gelatos.  I added lots of separation from the background and my photo with lots of layers of solids.  Plus I added a bit of vellum in there, too.  I never want to the photo to be drowned out, so I always make sure that nothing overpowers it.


I added a fun die-cut to the background.  This one was made by Wilna over at Two Peas a while back, and I just LOVE it.  I cut it in white and then "messied" it up with a stamp.  I wanted it to show, but not too crazy since the background is busy enough.


A close up of the gesso and gelatos.  I also added some striped washi tape here and there....I LOVE this striped tape.  I use it A LOT.  It's from Michael's.


Messy thread is a great way to add texture and interest to your layouts.  I used a random wooden veneer heard here that I painted blue.  You can also see that I used four different fonts for my title.


The other side of the photo...more thread and a fun arrow paper clip from Hobby Lobby clearance! Score!


I hope this inspires you to use a busy background...it's really fun to challenge yourself to do something you don't normally do.  I'm getting more comfortable with these busy backgrounds.  It's all about finding the balance and not letting it overshadow your photo.

Thanks for stopping by today!

Wednesday, July 23, 2014

Vegas! / Stuck?! Sketches & My Scraps

Hello again!  I hope your Wednesday is off to a great start.  Today, I'm sharing a layout I created using a sketch from Stuck?! Sketches.  As soon as I saw it, I was inspired.  I love all of the triangles and layering. 

I also created this page for today's challenge over on the My Scraps & More boards.  Since my layout is about one of my favorite places....VEGAS...the challenge is to use some glitter and something shiny on your project :)  I used a gold glitter frame (from Crate Paper), some MME gold glitter tape, some gold embossed chipboard stars and some shiny gold thread.

I used the absolutely gorgeous Capture Life collection from Echo Park...this bokeh background reminded me of all the lights in Vegas, so it was perfect for my background!  I usually like to use paste and paints on my backgrounds, but this one needed no extra help...it's gorgeous AS IS!


Here you can see lots of the gold shine and glitter!  I'm obsessed with all things glittery and shiny these days!


Even when I make a mess with embossing powder...it still looks great on a layout about Vegas...haha!  That's because it practically rains glitter there :D  I found a pack of these cute arrow paper clips on clearance at Hobby Lobby weeks ago...I love them!


These big bold alpha stickers just seemed perfect for my title...Vegas is bold and loud!


Thanks so much for stopping by today!

Tuesday, July 22, 2014

Pie Charts / My Mind's Eye

Happy Tuesday!  I'm so excited to share my latest layout for My Mind's Eye today!  It was up on the blog HERE yesterday.

I have really been inspired lately by die cuts.  If you own a Silhouette Cameo or another type of die cutting machine, you know how easy it is to get almost any shape you want or need.

I love this pie chart shape!  It's one that Two Peas had, and I've always wanted to create a layout like this, backing the pie charts with different patterned papers.  I used the beautiful Market Street Ashbury Heights line for this.

I love the shiny gold in this collection, so I incorporated the metallic tape in gold to the mix as well.  I cut a few smaller pie charts that I didn't back with paper to add some texture and interest to the white space.  This collection is so versatile and can be used for many types of photos.


The chipboard words are amazing in this line.  The colors are so pretty, and the fonts are awesome.  I layered one of the mixed bag banners with chipboard here as part of my title.


Don't these colors and patterns go so well together?  I love how they all look up next to one another like this.  That gold glitter tape....I can't stop using it!  It adds such a brilliant sparkle anywhere you use it.  I added in some gold thread underneath my photo.  I love the look of a neat page with a bit of a messy factor thrown in :)


Lots of layering going on here...chipboard, stickers, paper, thread.  It all coordinates so well together.  I like making sure all the colors in my layout are sort of evenly distributed around the page, and the chipboard pieces make that easy to do.


I hope this inspires you to incorporate die cuts into your layouts.  They really do add that little something extra to your designs, and it's fun to play with them.  They make great layers as well as focal points.

Thanks so much for stopping by today!

Saturday, July 19, 2014

Chickaniddy / Pool Party + New Collections Giveaway!

Hey there!  Today I wanted to share a layout I created for Chickaniddy Crafts earlier this week.  You can find the blog post HERE.

I couldn't wait to use the bright and beautiful 
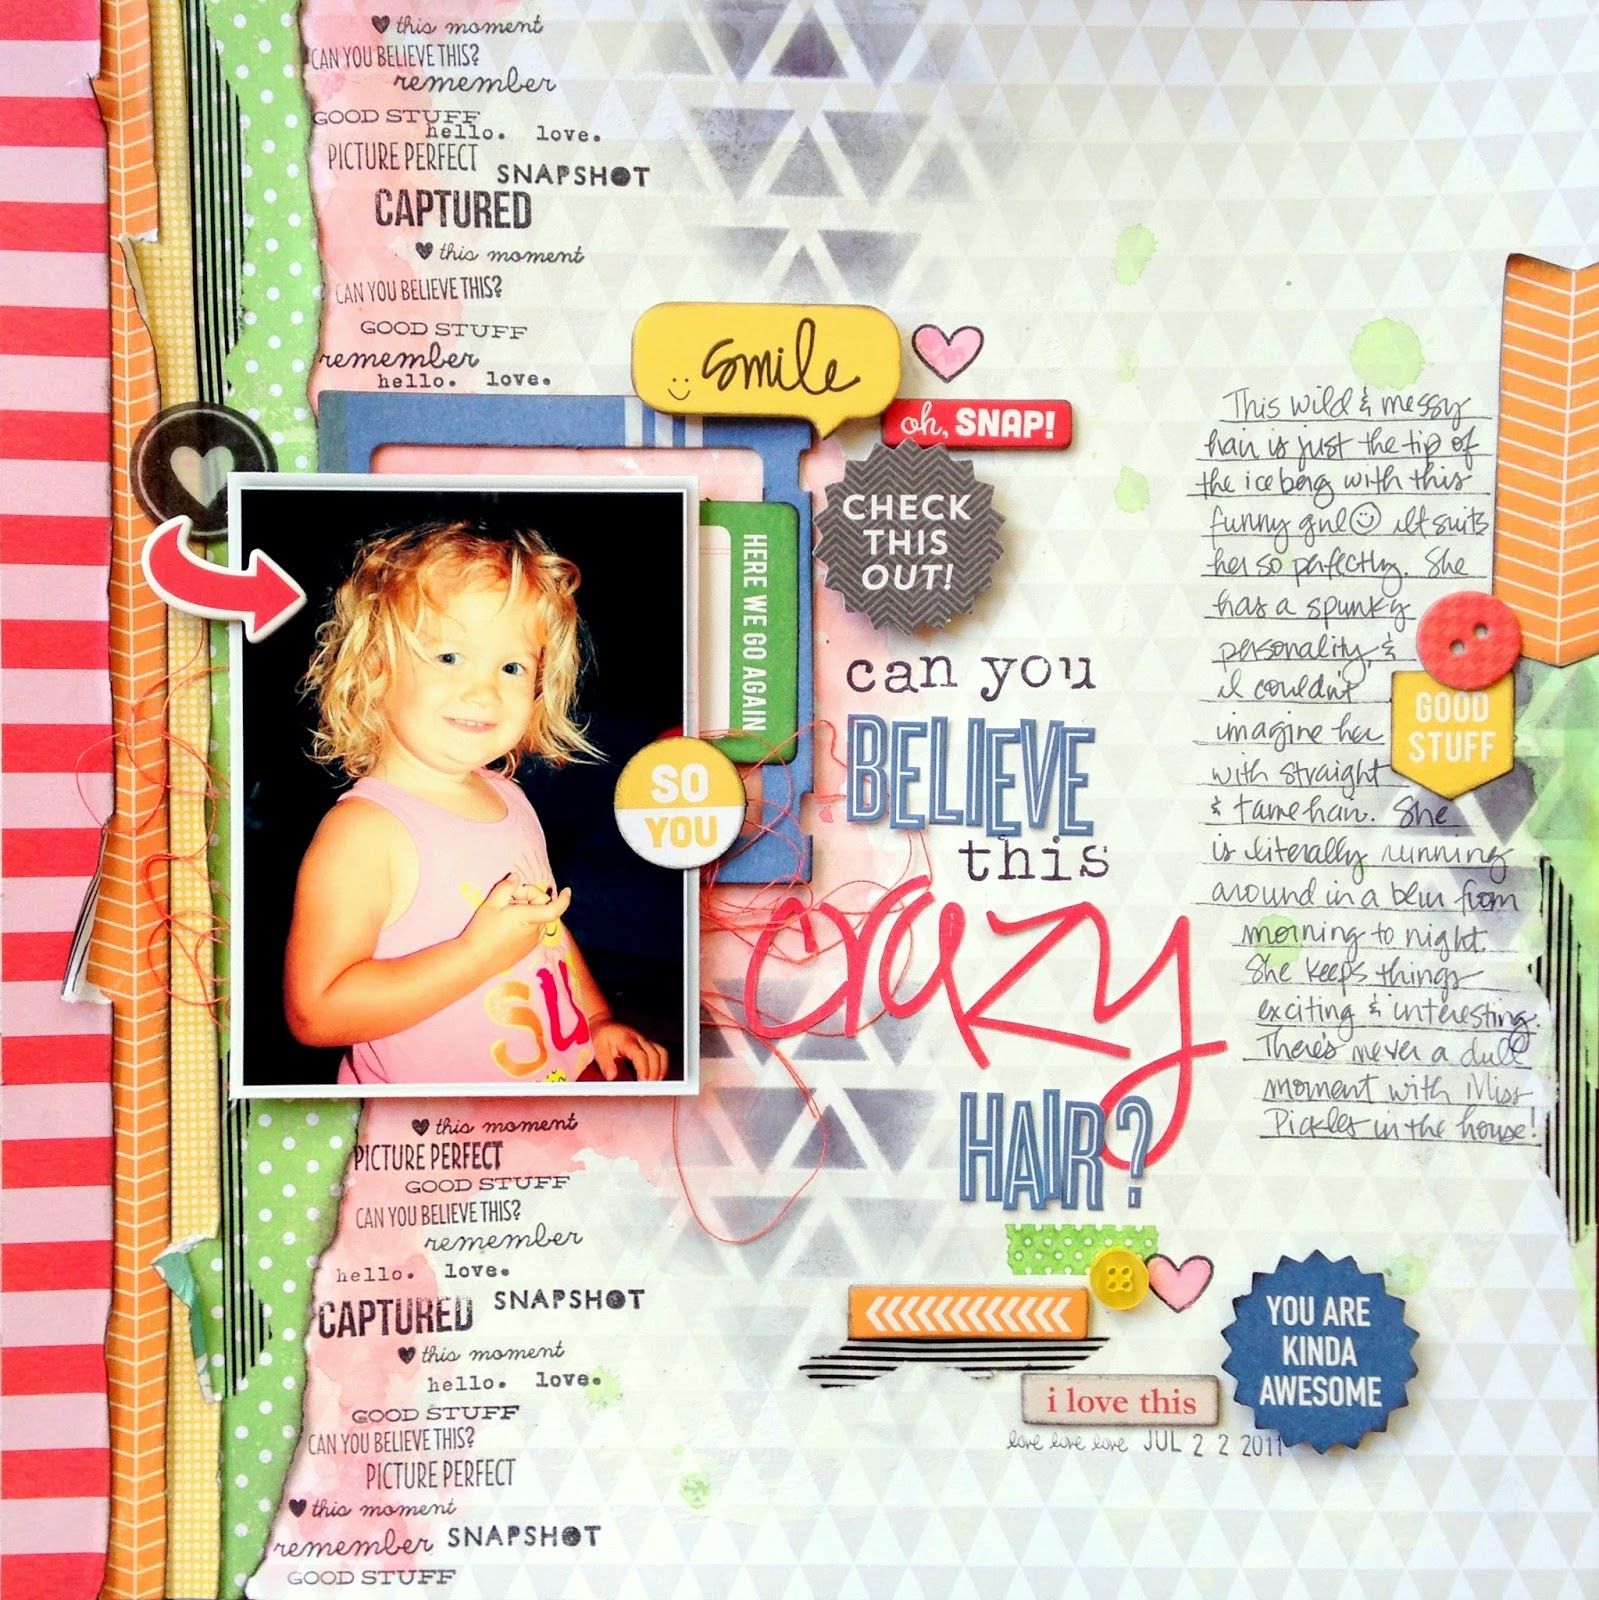
Twirly Girly line for a fun and bold summer layout!  I wanted to scrap this photo of my little girl in the pool, and since there is a ton of blue in it, I decided to add bits of more blue around the paper since there are no blues in it.

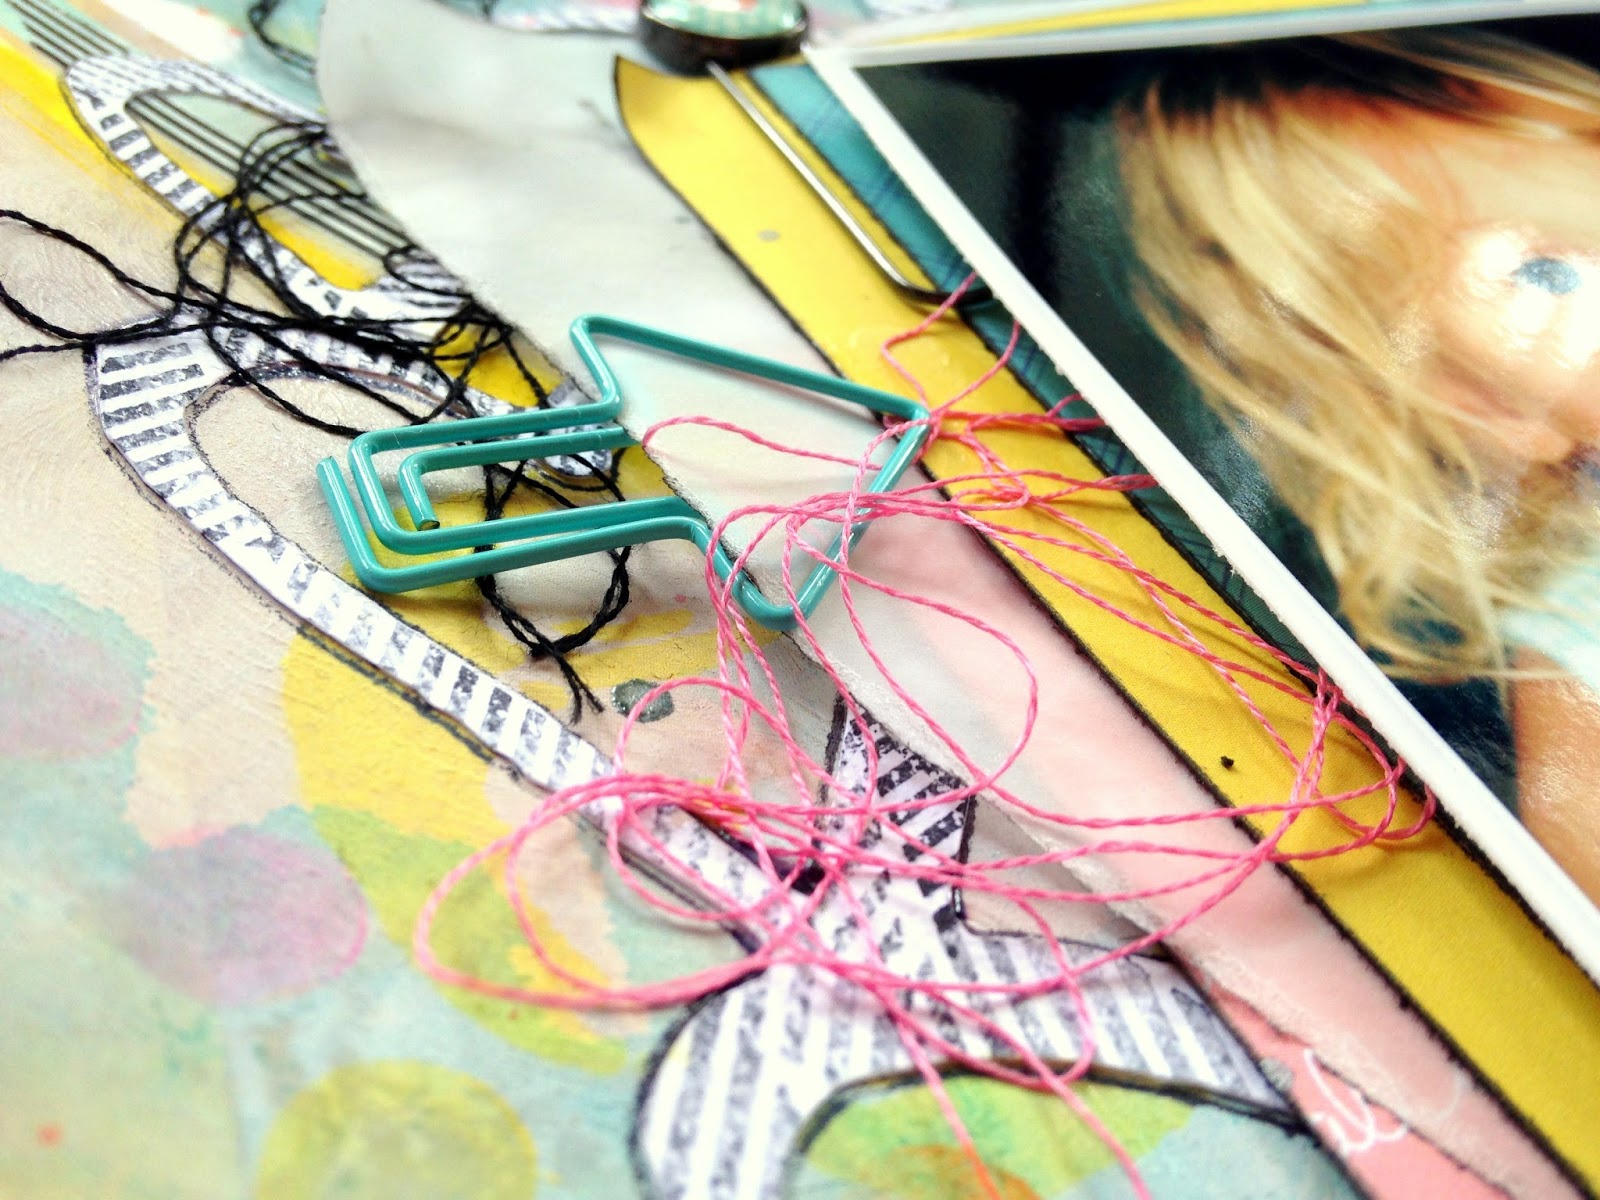
I started with some gesso on the background.  This is a very busy patterned paper, and I didn't want it detract from the photo.  The gesso helps soften edges and sort of fade out colors.  Once that was dry, I used a rainbow array of watercolors.  I added splatters of blue around the page.  I added lots of background stamps and some blue thread as well.  I love that the blue works well in this, even though it was a color I added in on my own.  The layers underneath my photo all represent the rainbow and look great up next to the blue photo.


Here's a close up of the watercolor, stamping and doodling.  I love tracing around my titles to make them pop a little more.  I like that it's messy and not perfect.  I also traced around the sentiment sticker and the days of the week stickers.


I just love these fun banner stickers, brads and enamel hearts!  They add such fun details to layouts.  I used them like little flags on the side of my photo.  I curved up the edges of some of the layered papers to create more depth.


More stickers and layers!  I have more information on how I colored these cute days of the week stickers at the end of the post :)


I really love the alphas in this collection.  Not only are they super cute, but the thickness is really great.


I wanted to use these stickers on my layout, but I wanted them each a different color.  I simply took some gesso and covered the orange edges a few times.


Once it was dry, I went over each one with a different color watercolor.  Easy!  Now I have rainbow days of the week stickers.


I hope this inspires you to get out those summer photos and create something bright and bold!  And also to use your photo as inspiration to create something unique on your page, like I did with the blue elements.  You can make it work if you get creative!

Thanks for stopping by, and have a great day!

Supplies Used: TG140S10 Grandma's Quilt, TG140S02 Birthday Girl, TG140S12 Piggy Tails, TG140S04 Keepsakes, TG140S08 Itty Bitty Ballerina, TG14EB01 Alpha Stickers, TG14EB02 Sticker Sheet, TG14EB03 Mini Sticker Tags, TG14EB05 Mini Sticker Sentiments, TG14EB06 Brads, TG14EB07 Enamel Hearts, TG14EB03 Mini Sticker Banners, DN14EB03 Mini Sticker Banners; Other--Liquitex Gesso, Watercolors, StazOn Ink, Recollections Stamps, Thread, Sharpie Black Pen, Silhouette Cameo, Cardstock, Crafter's Workshop Template, Tim Holtz Distress Ink.


**********************************************************************************

And now, on to the GIVEAWAY!  In case you didn't see earlier this week, Heidi's two new collections were debuted on the blog, and they are to die for!  They really are so bright and fun.

All you have to do is LEAVE A COMMENT on each collection's blog post to be entered to win!  Super easy!  Click HERE to see the new Scrumptious collection.


 And click HERE to see Jolly Good.

They are both AMAZING! 

And one more thing before I sign off, Chickaniddy is also having a Craft Team Call!  You can see all the details HERE.  It's a GREAT company to design for, so I hope you give it a shot!

Thanks so much for stopping by today, and have a great weekend!

Friday, July 18, 2014

Birthday Fun / My Scraps & More

Happy Friday, friends!  Have you been over to the My Scraps Sketch Blog today?  There's a new sketch up, and this is the layout I created using it.  

Sometimes I don't know where my ideas come from.  I saw the sketch and started browsing through my photos.  I always have a lot of birthday pictures, so I picked four that featured my daughter with various family members.  I decided to use some of the Birthday Bisque line from Jillibean Soup.  I love bright colors, so this one was perfect.  I mostly used the stamps from this collection...oh my goodness are they awesome!

I used the big numbers stamp to create the background.  I used watercolors to paint in each number to created a rainbow effect.  I love how it turned out!  The yellow background sheet was a random sheet from my stash, and I drew the long rectangles, outlined them with black pen, and used gelatos to give some colorful smudgy shadows.  The rest is bits and pieces from JS...and more of their stamps.


I just love the nickels and sticker buttons!  And the bits and pieces contain lots of fun arrows.  So great for layering and adding interest.  


More stamping, buttons, arrows....and my title.  I cut "birthday" on my Cameo and watercolored it blue.  The yellow "Fun" is the JS Beanboard Alphas.


Here's one more close up of the other side of the layout.  More fun goodies!  I tell you, the stamps were so much fun to use here.  You can really get creative and created your own embellishments and/or backgrounds.


Be sure to check out today's sketch as well as the My Scraps Store!  It's still full of goodies, and SO MUCH MORE is on its way!  You won't want to miss out on what's coming :)

Have a GREAT weekend, and thanks for stopping by!

Wednesday, July 16, 2014

Mama's First Sunroof / 123 Challenge Blog

Happy Wednesday, scrappy friends!  I have a layout to share today that I made just for fun.  I came across the current challenge over at 123 Challenge Blog, and I just had to create something to submit.  The bright colors are so me!  I don't remember the last time I created a layout to enter into a challenge...it feels great! For this challenge, you had to incorporate all three of these on your project.


I pulled out some of my Jillibean Soup stash for this.  I decided to go bright with the blues, so I used watercolors and gelatos to paint my own blue background on white cardstock.  This is my FAVORITE blue color!  I went with this busy and bold houndstooth background, but I toned it down with gesso and watercolors.  And the blue piece helps break it up.  I cut a lot of the cute circles from patterned paper, and the rest are just bits from the sticker sheet or ephemera pack.  I added in some vellum, stamping, buttons, tape and thread for extra touches.  I also used a few cut-aways from the American Crafts Plus One line.


I used lots of pop dots to create depth and make it easier to add layers and pieces underneath.  I also stamped on this vellum circle...I just love the look of vellum.


I stamped the word {awesome} and I cut up one of the little cards from the JS line.  Since I was enjoying some sun through my sunroof, I needed this saying on my page!  I mixed up my alphas...the yellow letters are JS, and the FIRST is from the set of JS alpha stamps.  I cut "Sunroof" on my Cameo and watercolored it pink.  Those pink splatters are from the Picked Raspberry Distress Ink over a Tim Holtz stencil.


I cut up one of the circle placemats and used it as a layer.  Thread is such a great tool to use...not only does it give wonderful texture, but it adds whatever color you need right in the spot where you need it :)


Thanks so much for stopping by today! 

Tuesday, July 15, 2014

A super BRIGHT layout for Chickaniddy!

Hey there!  Just wanted to show you a close-up of a project I have up over on the Chickaniddy Crafts blog today.  It's full of bright colors and just screams SUMMER!  I also show a small tutorial on how I changed the color of some of the stickers :)

Head on over HERE if you'd like to see the whole layout :)


Thanks for taking a peek!

Sunday, July 13, 2014

Creative Scrappers #273

Hey, scrappy friends!  Are you ready for another awesome Creative Scrappers sketch?  This one gives you lots of layering opportunities, which is one of my favorite things to do :)  Check it out:
 
Here's what I created using this sketch...a fun layout featuring some delicious FOOD!  I pulled out some American Crafts Plus One goodies, along with a few other AC collection bits and pieces and went to work.  This BBQ slaw burger was the BEST burger I've ever eaten...omg!  I wish I had one RIGHT NOW.  Okay, enough about food...haha!

I usually don't scrap about objects.  Most of my layouts are about people.  However, on our last trip to Vegas, I found myself taking pictures of lots of THINGS I loved.  And I thought I'd take on the challenge of scrapping them...starting with some food.  This AC line has some fun pieces that are perfect for food scrapping.  I love the reds and oranges mixed with the light teal...not a color combo I'd put together in my head.  But after seeing it together, I really like it!


Those gold glitter frames are from Crate Paper, and I thought since this was a page about Vegas, some glitter NEEDED to be on it...haha!  It's all about the flash :)  I added pop dots to my photos and middle square.  That makes it so easy to add things underneath them.


I love this Cameo cut!  I love the font, and I think it's perfect for this title.  I did some hand stitching and stamping, and I also added a rub-on for some more teal color.


That plane puffy sticker is my fave!  Those stickers remind me of when I was a kid and I had a huge sticker book full of puffy stickers.  So much fun!  I used some Studio Calico wood veneer arrows, and that gold heart is a CP rub-on.


You simply must hop on over to the Creative Scrappers blog and check out the rest of the team's layouts...so much inspiration!

We would love to see your take on this sketch!  Be sure to link up your layout, and you could win a prize from our sponsor this month...Paper Camellia!  The deadline to submit is July 31st.


Thanks for stopping by today!

Friday, July 11, 2014

A layout just for fun!

Friday is here again...woo hoo!  Today, I'm sharing a layout that I created just for the heck of it.  No design team requirements, no challenges...just for fun.  I honestly don't remember the last time I created anything just because.  It was a great feeling!

I had the Hello Again collection from Carta Bella laying on my desk from a previous layout, so I decided to challenge myself to use it up.  (I still have some left over, but at least I made a big dent in it!)

Lately, I've been enjoying starting with a busy background.  I like to spread gesso on it to blend out some of the "busyness."  I took some acrylic paints and used a credit card to smear and smudge them around.  I chose colors that were in the collection.  I wound up not using any more patterned paper, but I used several stickers from the line.  The rest of the embellishments are die cuts that I cut on my Cameo.


Here's a close up of the gesso, paint, stickers and thread.  I just love the messy and random look.


Paint!  Smudging paint is so much fun...you really should try it!  That Good Stuff is a die cut.  The Laugh Loudly is a Jilllibean Soup stamp.


I cut this out in white cardstock.  I traced it in black pen, and then I took a stamp and gave it this dirty look.  It kind of looks like car tracks...haha.  I also added a bit of yellow gelato for some color smudges.  I used patterned paper to back the You and Me.


And here's what I NEED to be doing.......putting these layouts into protectors and albums!!  Ugh!!  How did I let this happen?!  Do you have a layout stack like this?!


I'm ashamed of my layout stack...haha!  I just don't feel like taking the time to do this...I know it's going to take time.  And I'd rather be creating!  Argggghhh!!  The problems of a crazy scrappy lady..... haha!

Have a GREAT day!