Hey there, friends! I'm back today with a new layout for the Paige Evans Design Team featuring Paige’s Bungalow Lane collection. My photos inspired my color scheme so I went with lots of pinks and yellows. I started with tearing a big chunk of Paper 8 and adhered it to some thick white cardstock. I wanted to create a gradient effect on the yellow paper so I smudged a lot of white gesso on the right side. I also used part of the Floral Butterfly Cut File to add to the background. I had previously cut the butterfly on Paper 16.
I just trimmed around the edges of what was left on the paper and used
it as a fun background element. I embellished with lots of the Floral Die Cuts, Epoxy Stickers, and stickers from the 8-Page Sticker Book. I pulled out all the bits and pieces I could find that were pink or yellow. I also used a flower from the Acrylic Stamps to create a few more flowers using gold ink.
I mixed and matched flowers and hearts here as well as “Amazing” from the Foam Phrase Stickers.
I popped up some of these bits with adhesive foam to create dimension
and shadowing. I tucked in gold metallic thread for added texture and
shine.
I created a little cluster under the photos with more of the Floral Die Cuts and stamped flowers. I mixed and matched the title with an Ephemera Die Cut and Thickers.
I stitched through the "XOXO" with metallic gold thread and then
journaled underneath with a gold pen. I continued with the stitching
around the butterfly.
For the background, I used gold and pink Shimmerz with a brush to spread
around the color and then splattered the color around. I also added white acrylic paint splatters. I love this shine! I topped off this part of the page with more tiny butterflies from the 8-Page Sticker Book and tiny flowers I fussy cut from Paper 5.
I used a few of the fall leaves on the right side. There are so many types of them in this collection--die cuts, stickers, even in the patterned papers.
I love all of this fun shimmer, texture & dimension! I've shared this tip before, but if you have metallic gold stickers that are too shiny and bright for your taste, just smudge some white gesso over it using your finger. You can see these two gold leaves on the right side here. They are still shiny but just a bit toned down. I added adhesive foam under some of these flowers, and the lift it gives them just does so much.
Here you can see how the gesso looks on the yellow paper. I love that smoky hazy look it can create. And these tiny flowers & butterflies were perfect for the top part of the page. I fussy cut the flowers from patterned paper, so always look at your papers for anything you can cut out--especially if you're looking for smaller bits to add in.
Gold thread...yesssss! So many layers and levels here. It took me years to finally perfect my layering game...haha :D I didn't always do it, and when I did it didn't look right. It's one of my favorite things to do now.
Here are a few more close-ups of all the details :)
I hope this inspires you in some way today! I had a lot of fun making it
and it was fun to let my photos help me choose my color palette.
Be sure to check out my process video to see how I made this page from start to finish:
Thanks so much for stopping by! Have a great Wednesday :)
Happy Sunday, friends! I'm back to share another new layout for the Paige Evans Design Team. I'm still digging into the Bungalow Lane collection, and for this page I decided to incorporate one of Paige's cut files--it's called Floral Butterfly. I cut it pretty big on Paper 16. I just love that gradient pink. I started with that and went from there.
I chose textured white cardstock for the base, and I coated it with clear gesso first to prime it for all the watercolor. Once it dried, I came in with a few gold Shimmerz Paints--Inklingz Miner Miner 49er and Shimmerz (original) Christmas Cheer. I used a brush and some water to move the color around so it would show behind and around the butterfly. I also added some blue splatters using Inklingz Oakie Bear Blue. The very last thing I did was add some messy blue around the edges of the page. Once the background was dry I started embellishing.
I used several flowers from the Floral Die Cuts and tucked them under and around the two stacked photos. I pulled a few of the small buttons from the Chipboard Stickers and the Puffy Stickers to add to the centers. I love how you can see the watercolor here, and the fun texture from the cardstock is awesome.
I used the small butterfly stamp from the Acrylic Stamps to create a few little die cuts. That's a great way to use stamps if you don't want to stamp directly onto the background. I pulled out a scrap piece of white cardstock, stamped the butterflies using a gold ink pad and then just cut them out. I popped them up with some adhesive foam. Easy!
Same thing over here...more flowers and stamped butterflies. I did add some white tissue paper behind my photos and popped them up as well. I used this Foam Phrase Thicker for my title. This was the perfect spot for it, and I love the neutral color because it pulls out the gold on the background.
I also mixed two blue threads together here to add some texture and color.
To add a weathered look to the cut file I smudged some white gesso over it. I wanted to accentuate the gradient by fading out the light color even more.
I used three of the metallic gold butterflies from the 8-page Sticker Book. I toned down the shine by smudging a bit of white gesso and just stuck them flat to the page. I love creating different heights with different pieces. It really helps to pop everything off the page and just bring it to life even more.
More close-ups here of all the details :)
I did decide later to layer a bit of Paper 4 under the photos for a light blue pop. I had already glued the photos down, so I just trimmed a sliver of the paper and wedged it under the photo's edge. I also fussy cut a few tiny flowers from a sticker from the 8-page Sticker Book, stuck them to some cardstock and used them as die cuts.
I love how this layout came together, and I hope it sparks an idea or two for you. It's fun to get messy and incorporate cut files and stamps...all the goodies! LOVE!
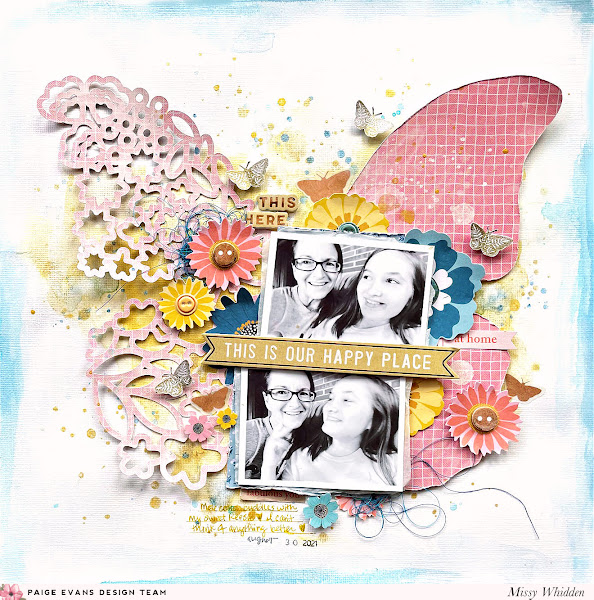
Hey friends! I'm back today with a new layout for the Paige Evans Design Team featuring Paige’s Bungalow Lane collection. I wanted to create a layout about our little family at home so I began with my photos and some of the Chipboard Stickers.
I created a little landscape with one of the houses and two cute trees
and arranged them along with my photos in a horizontal design going
across the page. I tore a piece of Paper 24 to
layer underneath everything to give the illusion of grass, and this
also gives the house and photos a place to sit. I embellished below that
with lots of Floral Die Cuts. I used thick white cardstock for the base and added pink and blue Shimmerz to create pretty watercolor effects behind everything.
I love creating clusters, so I chose a few of the large Floral Die Cuts to add down below the photos. I used another Chipboard Sticker for the title. I tucked in yellow thread and then added in a few of the metallic gold leaf stems from the 8-Page Sticker Book. For a larger title here, I used some of the Thickers to say “FAMILY.” I fussy cut “lucky” from an Ephemera Die Cut and “Better Together” from Paper 23.
I love all the dimension here. I popped up this large flower with
adhesive foam and “LUCKY” is glued at the bottom of the “FAMILY” which
gives it shadowing.
This little house was perfect for this page and I tucked in a few trees
behind it. This is a great way to create depth and give the images a
more realistic look. The Chipboard Stickers are already pretty thick, so layered on top of each other like this gives the page even more dimension.
I wanted a bit more pop of yellow down here, so I tucked in some yellow thread. I toned down the metallic shine on the gold leaf stickers by smudging some white gesso over them. This gives them more of a matte shine.
If you're a fan of dimension, layering chipboard will create it right away. If it's too much height for your liking, you can peel some of the chipboard layers off the sticker to make it a little thinner. Works great!
I'm so glad I added this green piece of Paper 24. It really makes a difference with creating a base for everything to rest on. Are you a fan of tearing paper? I love this distressed and crooked edge.
For the background, I first coated the cardstock with clear gesso.
This primes the paper and allows the inks to spread around and blend
together before soaking into the paper. I used blue Shimmerz paint to
create this pretty watercolor look on the bottom half of the page. I
used a brush and water to spread the paint around. I chose blue because
all of the other pieces here are contrasting colors. I splattered white acrylic paint over the blue and then layered gold glitter spray. I did the same effect on the top half of the page but with pink sprays.
Here are more close-ups :)
I hope this gives you some inspiration today--I love creating little scenes like this. If you'd like to watch how this page all came together, check out my process video:
Thanks so much for stopping by, and have a great day!
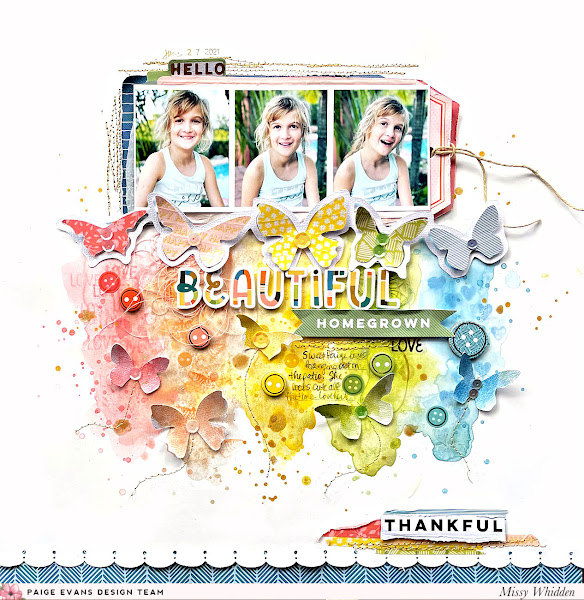
Hello again, friends! I'm back today with a new layout for the Paige Evans Design Team featuring the beautiful Bungalow Lane collection. I wanted to use the Washi Tape so I combined those with Paige’s Butterfly Border cut file to get my design started. I cut the butterflies on textured white cardstock and
then covered the inside pieces with the tapes in rainbow colors. I
placed them back inside the cut file and popped them up off the page
using adhesive foam. I tucked my photo strip along the top of the
butterflies and added mixed media down below.
I used thick smooth white cardstock for the base and I coated it with clear gesso first. I pulled out Shimmerz Paints that coordinate perfectly with Bungalow Lane and painted each color under the matching butterfly. I also used the Acrylic Stamps to add subtle details to each color section. I love how the mixed media turned out here. I wanted the colors to stay
separated but also blend into the next one. I wanted to embellish a
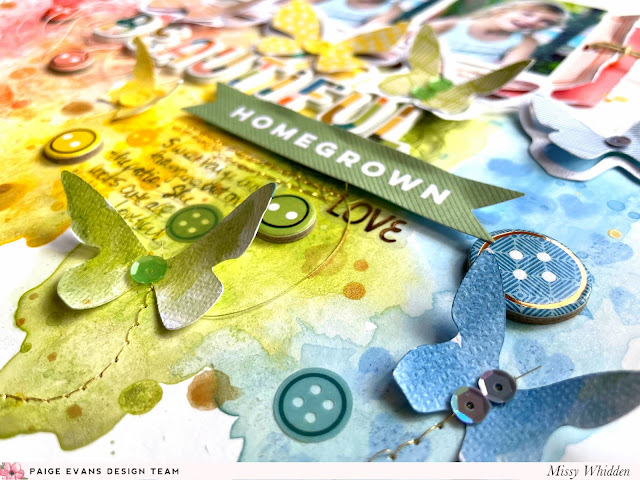
little bit down in those areas, so I used a few cute buttons from the Chipboard Stickers and the 8-Page Sticker Book. I added more detail to these butterflies by machine stitching metallic gold trails. I love the detail of stitching so much!
Here you can see how I used the Washi Tapes to cover the butterflies. I just added the tape and then trimmed around the edges and placed the butterflies back inside the cut file. I added some adhesive foam under them to pop them off the page and then added a few sequins to the centers.
Here you can see the subtle stamping detail. It's very small...just adds a bit of interest and texture. I had originally cut the butterflies a few times, so I had some extras. I painted one of each color and added them to the bottom areas of each color.
I added a few simple layers behind the photo using Paper 22 and some white tissue paper. I got in the mood to machine stitch, so I did some messy lines using gold metallic thread.
I added some cord to this pinkish tag to finish it off. Love that texture!
I love the look of watered down stamping. I smudged these hearts with some water and they turned out hazy and soft. Very easy to do when you use gesso on the background :)
At the bottom of the layout I decided to pull out an old Martha Stewart scalloped border punch and add some color & interest. I added a bit of Paper 12 and then tore small strips of each Washi Tape. I added a "thankful" die cut and more machine stitching.
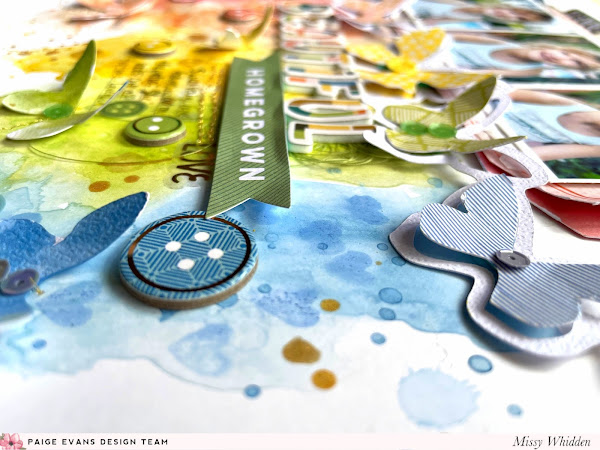
The Washi Tapes are so much fun to use! I used some the Foam Phrase Stickers for
my larger title and I centered it under the butterflies. I added
matching thread under a few of the butterflies and then added the
“Homegrown” from the Ephemera Die Cuts to
complete the title.
I had a lot of fun making this, and I hope it inspires you today. Thanks for stopping by, and have a great weekend!