Tuesday, June 30, 2020

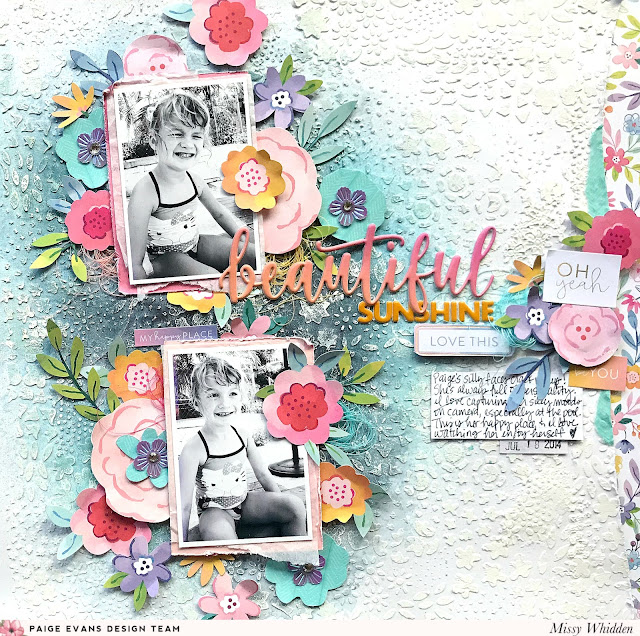
Beautiful Sunshine / Paige Evans DT

Happy Tuesday, friends!  I'm back today with a fun summery Bloom Street layout for the Paige Evans Design Team featuring Paige’s new Flower Garden Background Stencil. I was inspired by the dark blue background from Paper 02 and how all the bright flowers just pop right off the page. I wanted to recreate that dark blue background incorporating some mixed media, so that is where this page began. I used thick white cardstock as my base and I coated all of it with clear gesso first. I scraped white modeling paste over the stencil covering the entire page. Once that dried, I used a few blue Shimmerz sprays to create a pretty blue color wash. I fussy cut lots of flowers from Paper 02 and Paper 12 and arranged them around my photos.


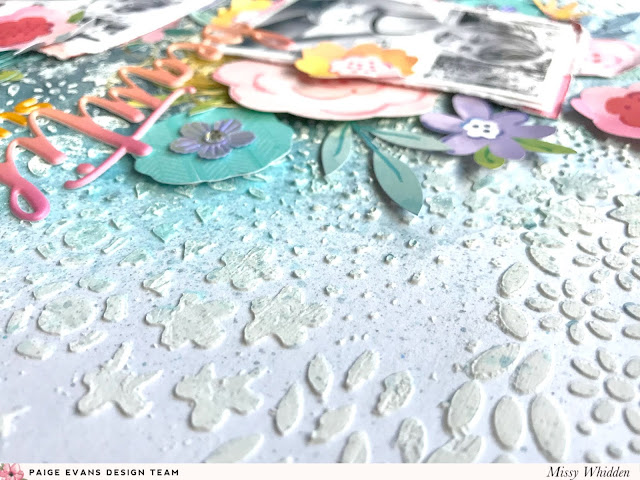
The texture turned out so awesome! It’s nice and raised off the page and very bumpy to touch. Once the blue sprays dried, I used a foam ink blending tool to lightly smudge white acrylic paint over some of the raised edges - this helped to give the shapes a little highlight and pop off the page a little more. I scattered the flowers all around the photos, making sure to get lots of different colors all over the page. I added in matching tangled thread in a few places as well.


I think modeling paste over white cardstock alone is so pretty.  It creates subtle texture, and even if you didn't add color over it, it's still gorgeous.  And it's so easy to do!


I love mixing and matching flowers and these went together perfectly! I wanted to add in a few turquoise colored flowers, so I used a roll of the Washi Tape to do that. I put some strips of tape down on scrap white cardstock and simply traced a few of these other flowers and then cut them out. Easy peasy! To top them off, I used a few of the purple flower sequin shapes from the Mixed Embellishments. For the centers, I added the clear rhinestones from the same Mixed Embellishments pack.


I know I use blue a lot, but I just can't help it.  I need to use navy blue more.  These bright colors are so pretty against it.


I have wanted to use this "beautiful" sticker for so long...haha.  It finally worked on this page!  It was the perfect color, size and scripty font.  And again, it pops against the navy background color.


More texture :)


I love how this little side cluster turned out.  I think the key to making it stand out is adding adhesive foam behind some of it.


I used one of the Puffy Vinyl Stickers for my title and combined it with one of the Truly Grateful Puffy Phrase Stickers. It was a perfect match! I love how the “beautiful” piece stretches across to the cluster over on the right of the page. I used more flowers and a few Cardstock Stickers for that.


A few more close-ups to wrap this up...


I really love how this page turned out and I hope it gives you some fun ideas to try on your next layout! Paige’s Stencils are just amazing! 

 Check out my process video for all the details:


Have a great week!  Thank you for stopping by :)

Friday, June 26, 2020

Pinkfresh Studio + Altenew "Celebrate" Collaboration Blog Hop & Giveaway

Hello and welcome to the Pinkfresh Studio + Altenew "Celebrate" Collaboration Blog Hop & Giveaway!  You should have arrived here from Caly Person's blog.  Get ready for a ton of new inspiration, prizes and more!  The new Celebrate collection is the perfect mix of both companies.  It includes beautiful papers, die cuts and stamps.  Thanks so much for joining us today!


Each designer in this blog hop is giving a way a $15 Gift Card!  All you have to do to be eligible is leave a comment on each blog post as you go.  The winners will be selected from the comments!  You have until July 2nd to leave your comments.  The winners will be posted on July 8th on the Giveaway Page.

There will be a FULL RELEASE GIVEAWAY on the Pinkfresh Studio Blog!!!  Definitely leave a comment there :)

Here is the layout I created using Celebrate.  It's full of gorgeous florals, so I couldn't resist fussy cutting out this large flower cluster.  I used a patterned paper as my background that has a lot of white space and pretty paint brush strokes around the outer edges.  I tore a big piece of this beautiful ombre paper for the top portion.  I used the Pinkfresh Studio Mini Ink Cubes to add some matching splatters around the flower cluster as well as stamp some large flower images.

 
I didn't use any gesso on the background.  I did use some separate textured white cardstock to stamp the flowers on.  I stamped them using Regal Kiss and Coral Reef.  I very lightly used my water brush to blend some of the lines.  I wanted them to blur a little, and I love how that turned out.  I fussy cut them out and tucked them under the big flower cluster.


I used a few of the Celebrate die cuts here as well as a few of the phrase stamps.  I mixed a few different colored threads here to match that deep purple color and then added in a short title using some white puffy alphas from another Pinkfresh collection.  All the white splatters are from some white paint I watered down.


I also added in some thread that matched the dark orange/brown color.  Normally I'm not a fan of brown, but this shade goes so well with the other colors in this flower cluster.  I created a cluster down at the bottom of the page using another stamped flower, a fussy cut flower, a few die cuts and more thread.


To get the stamped flowers to stand out a bit more from the big cluster, I painted a bit around them with white paint.  It's hard to tell, but the effect it created makes a difference, I think.


I love white splatters on solid colors like this!  I used a floral die cut frame as a little border layer around the edges of my photos.


These flowers and leaves here are also from the large floral cluster I fussy cut.  I only used about half of it down below, so I didn't want to waste the other part of it.


Here are a few more close-ups of all the beautiful goodness!


I have a process video here so you can see exactly how I made this.  I hope it inspires you in some way.  This is a beautiful collection, and I just know you'll love it!

Here's the link to my video:


Here are the links to all the products from the Celebrate collection:


There is also FREE US shipping or discounted international shipping on all orders $50+ from June 26-July 2.  Use these codes below for that.


Thank you for stopping by!  Your next stop on the hop is the lovely Amber Rain Davis. Happy Hopping, and have a great weekend!

Thursday, June 25, 2020

Everyday Madness / Hip Kit Club

Hello again, friends!  I'm back again today with another new layout for Hip Kit Club.  I am still digging into the 2020 May Hip Kits, and the goodness just keeps on giving :)  I went bright and bold with the colors, which I love.  I started by cutting one of the Stamp Market papers into strips and using those colors as my base for a color scheme.  I wound up adding in a strip of aqua as well.  I used white textured cardstock as my base, and once I had the strips glued down, I machine stitched through them using aqua thread.

Let the record state that I did not use any gesso on this page!  I know...who am I?  :D  I wanted to try something different.  The very first thing I did was mix a few of the blue & green sprays from Lindy's Gang that we received in past Color Kits.  I mixed them together on some plastic packaging and used a brayer to roll the paint onto the white cardstock.  It immediately dried and soaked through the paper, which I expected.  Without gesso, you can't really add water and smudge or blend the color.  I used that as a starting point and then added the strips.


I did wind up (later) using my water brush and some of the Stamp Market ink pads from the Color Kit to add some pinks and oranges here.  Again, I didn't use any gesso, so I had to be careful and mindful of how much water I added.  I also added some white paint splatters and then finally some black ink splatters at the end. 

I fussy cut some flowers from a patterned paper to use as layers here, and I pulled out an old Martha Stewart punch from my stash to punch lots of matching flowers from various papers.


I used one of the large Vicki Boutin word die cuts here and paired it with the large iridescent shiny Thickers for my title.  I changed up the shiny factor on the Thickers by smudging some white gesso o them and then lightly rubbing the yellow and orange ink pads over them.  I love the effect of that!


I used the Pink Paislee rhinestone and pearl dots as centers for the flowers.  I also added a few stickers here and there from the Pink Paislee and Dear Lizzy sticker sheets.


I used a few bits as layers under the photos.  Some Pocket Life cards, some leftover bits of paper...and I also fussy cut a few of the shapes from a Stamp Market paper.  I have no idea what the shape is, but it's similar to these flowers.  They are yellow, and I tucked them under the photos.


Here you can see more of the background.  I honestly prefer using gesso, but I wanted to demonstrate that you CAN still do some mixed media on regular cardstock if you're careful with the amount and how you apply it.


These pictures make me smile...Paige is such a violet hugger...haha!  You might get a kiss or you might get choked! :D


I added a few phrase stickers here on the paper strips that matched the colors.  Oh!  I also used some of the bright pink tissue paper that the kits were wrapped in...it's gorgeous!!


A few more close-ups here :)


I love how those metallic Thickers shine in the light!


I hope you guys are inspired by this...it was fun (and interesting) to make!  Don't let gesso make you afraid to try mixed media.  As you can see by this, you CAN do it without it.  Be sure to check out my process video to see exactly how this went down...


Thanks for stopping by, and I'll see you soon!


Monday, June 22, 2020

Homemade Memories / Pinkfresh Studio

Happy Monday, friends!  Here's my newest layout for Pinkfresh Studio.  I was so excited about how this page turned out!  I used several newer products from Pinkfresh Studio including the Let's Stay Home collection.  I wanted to try out this floral stamp from the Keep Going Stamp Set.  I used several of the Mini Ink Cubes for the stamping.  I wanted to create a floral background with blurry and runny edges...kind of like the page was left in the rain.  I used white textured cardstock as my background, and I did coat it all with clear gesso first.

I started by using a few of the blue inks to stamp the flower down.  I used a water brush to add just a touch of water to the stamped image and blurred the lines.  I love how the blues instantly started to blend and spread.  That was exactly the effect I was going for!  At first this was going to be a blue monochromatic page, but the lilac color sort of worked its way in...haha.


Here you can see the cardstock's texture.  The stamp worked great on this as well as on the gesso.  The gesso allows the mixed media to not soak right into the paper, so the water was able to blur the ink very easily.  I used a lot of things here...all from the Let's Stay Home collection.  Puffy stickers, die cuts, cardstock stickers, tags, patterned papers...all the goodies.  I also used the Frame Builder Botanical Circles Die here as well as some of the blue Essentials Jewels Mix.


I created a cluster at the bottom of the page using some paper strips from the 6x6 Paper Pad.  I combined more stickers and die cuts as well as more jewels and blue alpha stickers.  I popped up a few of these pieces to create some dimension and added some blue thread under them.


Behind my photo strip, I layered in more blue things including a large tag and a few patterned papers.  I love how these stamped parts turned out!


I added my journaling down here above the bottom cluster.  I wanted to keep some separation between the main section and the bottom section.  That white space does that.


I chose this Homemade Memories die cut as my main title from the beginning and knew I wanted it to overlap the bottom of my photos like this.  I layered blue thread under it and worked the cluster down beneath it.


I added in the lilac pieces after the blue layers were done.  I found this cute flower die cut and then added a few pieces of darker lilac paper pieces.


I lucked out and had the perfect lilac thread, so I machine stitched in a few places to give it a bit more texture.


I added more of the die cut leaf circles here at the top as well as this Quality Time die cut.  I distressed the edges of almost everything.  I love how the photo created the perfect space to layer this circle on top.


Here are a few more detailed images of all the prettiness :)


I might be obsessed with these jewels...they look gorgeous when they hit the light!


I hope this inspires you in some way today :)  I have a process video, so you can see how easy this background was to make.  It looks complicated, but I promise it isn't!  Mixed media is so fun, and I hope you try it if you haven't :)

Here's the video:


Thanks for stopping by!