Happy New Year's Eve, friends! I'm popping on today to announce the WINNER of the Pretty Little Studio Giveaway. Thank you to everyone who left a comment and participated!
Here are the goodies she'll be receiving...woo hoo!!
I had 16 comments, and I entered them into Random.org....and it chose #9.
And that person is DANIELLE HIGGINBOTTOM-BROWN!!
Woo hoo!! Congrats, Danielle! Shoot me an email at missy@whiddendesign.com and I'll let you know the details. Thank you again, everyone!!
Happy Friday, and Happy New Year! I can't believe it's almost 2017. Crazy! Today I wanted to share my newest layout for Bella Blvd. Our theme this week was New Beginnings and using lots of black & white products, so I decided to document some photos of my daughter making a new friend. Because of her autism, she has always been a loner and very standoffish. She is ten now, and she is finally warming up to her classmates. She made a new friend earlier this year, and it is the sweetest thing to watch. They hold hands and try and tickle each other....so precious! Her teacher snapped these photos one day and texted them to me. It just melted my heart!
I used lots of black and white Bella goodies and mixed in some color pops along the way. I used papers from the Addison and Oh My Stars collection, and those beautiful paint strokes on the right are from an Illustrated Faith Bright & Brave Clear Cuts pad, which is a booklet of clear acetate transparency pieces. I also used black and white die cuts, chipboard pieces, Designer Clips, Tabbies and Washi Stickers.
On this gingham paper, I used some white gesso so fade out some of the pattern. I used some watercolors to add some color and then added black splatters. I used a big Ciao Chip piece for my big title, and I just left it white. Here you can see some of the Washi Sticker hearts. That white circle with the black star is from the Ciao Chip sheet, and the "love" circle is from the Bright & Brave Paper Pieces. I also did some black stitching up the side here.
Lots of black & white going on here with pops of yellow and pink. I added a few of the black & white Tabbies here and a cute cloud Designer Clip in the background. I dug through some of my older stash and found the black & white Little Bits stickers.
Here you can see some of the dimension from the foam adhesive under the photos. I added in some tangled thread for more pops of color. The XO circle is from Bright and Brave.
Here's a look at the other side of the page. That red "You Amaze Me" circle piece is another piece that I fussy cut from the Clear Cuts pad. Those make such great embellishments!
I love these soft muted colors. I tried to match the same colors in the brush strokes from the Clear Cuts pad. I love these Ciao Chip words. They are awesome to add color to, but they also look great plain white.
I added a smaller title using black Tiny Text alphas and then stitched through them. I added a few strips of the Washi Stickers down below and then my journaling. I was easy to add all that in against the edge of the vertical paper.
I hope this gives you some inspiration for documenting a new beginning in your life! I had a great time making this.
Thank you so much for stopping by, and have a wonderful weekend. And Happy New Year, friends!
Hey, friends! I have a new layout to share for the Shimmerz Education Team using lots of Shimmerz Paints. I've had my hands on this beautiful Cocoa Vanilla Make a Wish collection for several weeks now, so I decided to pull it out. Right away I was drawn to this patterned paper. The cut apart card with the brush strokes just jumped out at me, and I immediately wanted to recreate that design on a larger scale. I pulled out some white cardstock, created the quote in similar fonts in my Silhouette software and cut it. I chose a rainbow array of Shimmerz Inklingz and Creameez to create with.
Here's what I came up with. I just love how it turned out! After cutting the quote, I left it on the cutting mat and painted all the brush strokes before peeling it off. I didn't use that much liquid, so it did not ruin my mat in any way. I used a large flat brush to paint and then used a rounder brush to splatter the paint. Once I peeled it off the mat, I began working on embellishing.
I love mixing Inklingz and Creameez together! For the yellow color, I began with Creameez Daffodil, but it was a tad too light. I added in some Shimmerz Sunny which made it a little richer in color. I machine stitched through each line with white thread and then added sequins in coordinating colors.
I fussy cut this gorgeous flower from another patterned paper and layered some vellum leaves under it. I also added some tangled thread and a bit of patterned paper behind my photo.
I added several embellishments around my photo including some stickers, vellum tags, die cuts and a bit more paint as well as some tangled thread. I also added some tissue paper behind my photos for a subtle border.
I just love a rainbow color scheme! I went through the vellum pieces and die cuts and chose flowers and other shapes that matched each color. I didn't want to make the layout too busy, so tried to be minimal with the embellishing.
I added some tangled thread under a few of the vellum flowers, and I love how that looks! I'm just in love with these colors. Shimmerz colors never disappoint!
I added my journaling under the photos and a few CVS stickers from the sticker sheet.
Here's one more look at the bottom area. This dark color is a new Creameez called Witches Blue, and it's gorgeous! The lighter blue is Creameez Ride the Tide with a splash of Vibez Jeni B Bleu mixed in.
Here's my process video showing how I created this. I also list every product and color I used on the layout. I hope you enjoy and gain some inspiration!
Thanks so much for stopping by! Have a wonderful day!
Products Used:
Inklingz--Beets Me, Honey Do List
Creameez--Just Peachie, Daffodil, Ride the Tide, Witches Blue
Happy Wednesday, friends! I'm so excited to be participating in a fun Top Ten Blog Hop hosted by my scrappy friend Christine Meyer. There are a bunch of awesome scrappers taking part in the Hop, and you can also find the Hop on each scrapper's Instagram feed. Several of us are also doing a YouTube Hop, so you can see and listen to us discuss our favorite layouts for 2016 and why we chose them.
Check out all these talented ladies joining in the Hop!
Here are my Top 16. Yes, I couldn't narrow it down to just TEN, so I went with 16 in honor of 2016. These are in no particular order.
1. I created this for Hip Kit Club, and I love the colors. I used Cameo sketch pens to draw the title, used watercolors to color in the letters and then hand stitched around it with coordinating colors of thread. I love all those flowers, too.
2. Another layout for Hip Kit Club. I found the quote on Pinterest and backed it with patterned paper. I did some subtle watercolor work on the background and then created two clusters to balance out the placement of the quote.
3. This was made for A Flair For Buttons, and I love it dearly. It holds a special place in my heart since it's about Autism Awareness. I recreated the hand print using my hand and some acrylic paints to start the background design and then came in with watercolors. I love what this page represents, and it celebrates how my sweet girls literally color my world :)
4. My first layout for the Bella Blvd Creative Team. I went crazy with the Illustrated Faith She Blooms flowers. I used lots of blue acrylic paint on the background to make those flowers pop. I love how the title turned out using lots of different fonts.
5. Another layout for Bella Blvd using Illustrated Faith Bright & Brave. I love all the bright colors and the pops of black. Those cassette tapes are awesome, too!
6. One more for Bella Blvd...I sound like a broken record, but I love the colors! The circles are a mix of patterned papers, Clear Cuts and transparencies. The stitching brings it all together. Plus, this celebrates my weirdness...haha!
7. This one is for My Mind's Eye. I love how the big title turned out. Although this color scheme is not my normal choice, I think it suits my photos perfectly. Plus it has a masculine feel to it, which showcases this photo of my husband well. I love the subtle watercolor in the background and all the messy thread.
8. This is a recent page made for Simple Stories. Again, I cut a large title on white cardstock and then backed it with patterned papers. I machine stitched all around those letters! I love how the big title encompasses the photo of my daughter trying to lick Santa...haha!
9. Another page for Simple Stories using the Carpe Diem line. Again, a big title backed with patterned papers. I just love the patterns and colors on this one, plus all the florals behind the photos.
10. I made this using my stash of washi tape mostly. I used some gesso and Shimmerz as well. I used lots of green and purple to bring out the colors in the photo. I just love this memory of my daughter wearing her giant shoes to bed. These fun phases of their lives must be documented because they fly by so quickly.
11. Another layout made from my stash...I started off this one with dark kraft paper. I covered it in gesso and then went to town with all the Shimmerz, creating some soft pastel colors. I wound up using it to back these pretty rose cut files and then arranged them on a grey patterned paper. I love how soft and pretty it turned out.
12. I created this earlier this year for The Cut Shoppe Design Team. Again, I cut this cute quote from Pinterest using lots of patterned papers. I love using colored cardstock as my background, covering a lot of it with subtle gesso and then using watercolors to add varying shades. Plus I love all the stitching!
13. Another layout for The Cut Shoppe. This time I used my photo behind one of the letters and then showcased it with softer colors of patterned paper. I love the sandy colored background paper and the watercolors on top of it.
14. This was made for my Guest Spot at Pink Paislee earlier this year. I used the same cut file as the above layout. Same idea...backed the letters with Fancy Free by Paige Evans papers, added gesso to the background and then came in with pink Shimmerz. I just love this quote and the photo so much!
15. I made this recently for Freckled Fawn. I love the white die cut on the white background and how the watercolor looks over it. Those big acetate words are so fun and colorful, and I love the pops of black and white. More of my favorite photos, too <3 p="">
16. Finally, I created this one not too long ago for a Guest Spot at Pretty Little Studio. Again, my favorite things: big title backed with paper, gesso, Shimmerz, thread and stitching. And POOL PICTURES! My favorite :)
Here's the video version of these layouts on my YouTube channel :)
Make sure you visit all the names on the list...there are some prizes along the way! Thanks for playing along with us!
Hey there! I'm back today to share a new layout for Hip Kit Club using the 2016 December Hip Kits. This is my first page using these new kits, and everything is so colorful and pretty! The first thing I wanted to use was this beautiful floral wreath cut file designed by Kim Watson. I cut it on white cardstock and then used a few of the patterned papers from the Main Kit and/or Paper Kit to back the flowers. I used some green Shimmerz from my stash to lightly paint the leaves. I chose this beautiful coral patterned paper from the Pink Paislee Take Me Away collection by Paige Evans for my background. I smudged a lot of white gesso over a lot of it and then used some Pink Shimmerz sprays from my stash as well as some of the Sweet Mint Color Shine (from the Color Kit) to create the watercolor effect. I also added in some of the Well Blue Me Down Coloringz and some purple Shimmerz from my stash.
I also used the dotted Echo Park stencil with some of the Coral Me Crazy Dazzlerz from the October Color Kit on the background to add some subtle texture. I embellished with Take Me Away die cuts as well as exclusive Hip Kit die cuts (in the Project Life Kit), My Mind's Eye gold acrylic shapes, some Amy Tangerine Thickers, and some Take Me Away sequins.
Here you can see the background texture really well. I love adding things to the background to add all those fun little details! Backing the cut file was a little tricky because of all the tiny cuts, but I love how it turned out. I added some yellow and purple sequins, and this "date" piece is from the exclusive ephemera pack. I stamped the date and and then stitched through it. I also added some gold Color Shine splatters to the background to go along with all those other colors.
Kim Watson did a fabulous job creating this pretty design! It would look great cut on any color or paper. I added some of the Take Me Away die cuts under and on top of my photo strip and then tore a piece of the American Crafts glitter tape for an added layer.
This cute "details" tab is exclusive, and I added two different colors of purple thread under it. This "hello you" tag was perfect for layering here, and I added some cord to the end of it. And more sequins and a gold acrylic heart :)
Here's another look at the layered pieces. These photos are just cute random moments with my daughter from a few years ago. Those are my favorite types of photos to scrap...those every day around the house shots.
One of the layered die cuts is the pink couch. I had no idea when or where I might use it on a page, so I used it as a layering piece. It gives a great pop of color and shape, and you would never know it's a couch. I also added in one of the Take Me Away decorative clips at the top.
To jazz up this white Thicker, I smudged some pink Shimmerz on it with my finger. It didn't stand out enoug, so I added some teal. I liked how that looked, and then I splattered some gold Color Shine on it. These Thickers are great for altering! I added the "Sweet" gold acrylic piece right on top of it and then added my journaling down under the wreath.
This was s much fun to make...these kits are just beautiful this month! You can check out my process video if you'd like to check out how I put this together. I hope you enjoy the process!
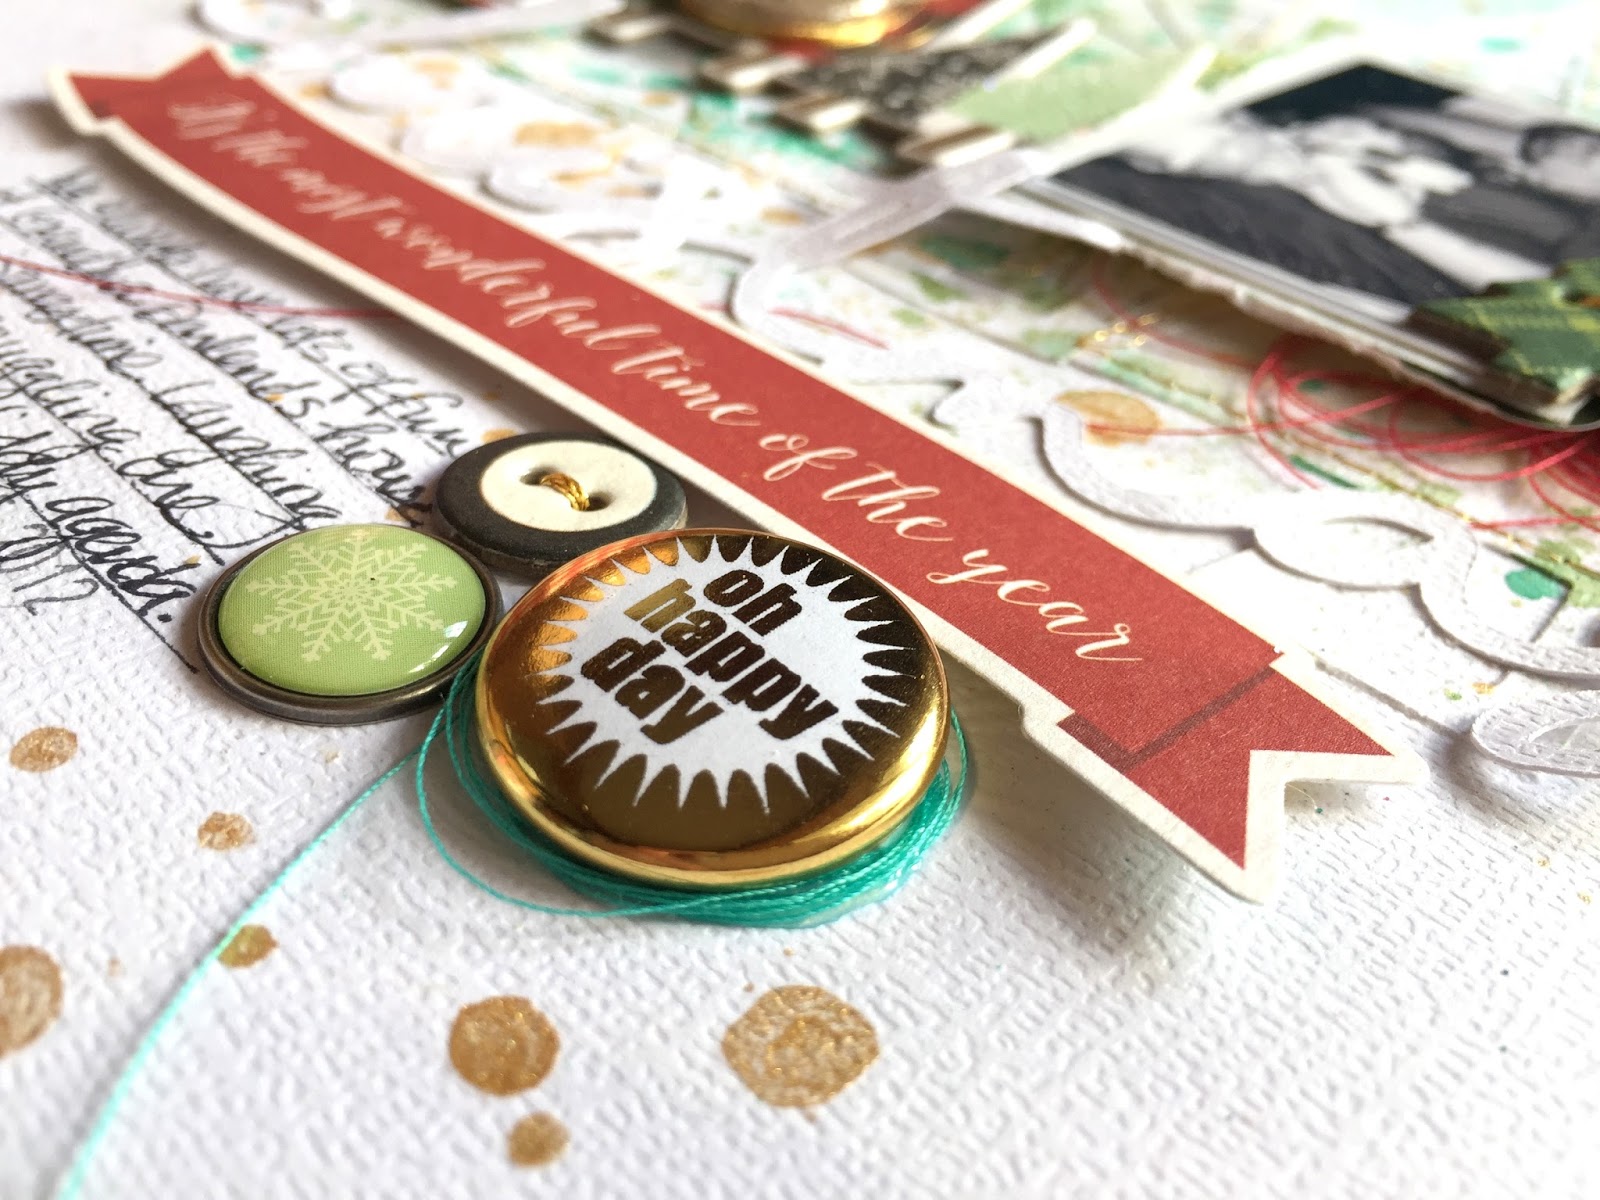
Happy Monday, friends! I hope you all had a wonderful Christmas. Our family did, and I can't believe it has already come and gone. Today I wanted to share a layout I created for A Flair For Buttons featuring two flair from the Here & Now and Love Gold Flair sets.
I created another Christmas layout using the My Mind's Eye Comfort & Joy collection. I had some leftover die cut Christmas trees from a Hip Kit Club cut file, and I arranged them on some white cardstock. I covered a lot of the area with clear gesso and then used a few different shades of Shimmerz sprays to add the green watercolor. I used some very light blue Shimmerz to add a faint sky behind the trees and then machine stitched through the trees with gold thread. I embellished with sequins, chipboard, a brad and some die cuts.
I love using plastic packaging over cardstock die cuts. Some of the color goes onto the die cuts and some of it goes onto the background. I love the messy look! Here you can see the fun texture from the stitching. I used some white sequins and some tiny gold stars from SpiegelMom Scraps.
I love this flair button. Even though it isn't part of a Christmas set, it goes with this page perfectly. I love the black and kraft mix, and I layered it right on top of this chipboard piece with some gold thread nestled under it.
The second flair button I used isn't from a Christmas set, either. This one is so cute, and gold always goes with Christmas, right? :) I created a fun little cluster here with a chipboard button and a brad. I added some foam adhesive under this long banner piece. I cut "christmas" on my Cameo in the Shoreline font. I love the white-on-white look here.
I added some tangled thread for added color and texture as well as a cute chipboard tree right on top of the photos.
Here's one final close-up of the title area. I love this font! All that pretty gold is Heidi Swapp Color Shine. It's so pretty mixed in with the green Shimmerz.