Friday, November 29, 2013

Never a Dull Moment

Happy Black Friday, friends!  I hope you all had a wonderful Thanksgiving yesterday.  We visited with family and enjoyed lots of yummy food :)  But instead of shopping today, I went to the gym instead.  It was the best decision, by far!  :D

Here's a page I created for My Scraps and More.  I used sketch #55 and some awesome Cut & Paste papers from American Crafts.  I love the colors!  I added in a bit of watercolor to my background, and even though my paper warped a little, I still love the results.  And I LOVE my gold Color Shine...it's awesome and shiny!  Yes!


I added in several chipboard pieces and some cord.  I think I add cord or floss to every page I make these days!


Paper layers, chipboard, watercolor and shiny gold!


I cut these fun words on my Cameo and then painted them to match.


Be sure to check out the My Scraps Sketch Blog for the weekly sketches...you could win a prize if you play along!

Thanks for checking in with me today!

Tuesday, November 26, 2013

This is What Matters Most **My Creative Scrapbook**

Hey there, friends!  Today, I'm sharing my fifth and final page featuring the November Main Kit from My Creative Scrapbook.  I love this woodgrain background paper, and it reminded me of being outside and getting dirty.  So I just had to scrap some pictures of my girls on the 4-wheeler!  They love riding, and these papers and colors were perfect for these photos.

This was a pretty simple page to throw together.  I kept it clean and didn't use any "wet" stuff except some dark brown mist splatters.  I get so into the modeling paste and paint, and sometimes it's nice to take a break from that and just go simple.  I added the cord into this layout...it's the only thing not included in the kit.


I broke out my crackle paint...hadn't used that in forever!  I love the look of it on this wood piece from American Crafts!


I love layering, and in this case, I also layered the cord as well as my papers.


Another wood piece that I colored with yellow acrylic paint and then inked the edges...


You can still get your hands on this kit....go HERE!  Be sure to check out the Design Team's Gallery to see even more inspirational layouts, plus the other kits that are available!

Thanks for taking a peek...have a great day!

Sunday, November 24, 2013

Creative Scrappers #256

It's reveal day at Creative Scrappers!  Woo hoo!  I think this week's sketch has been the most intimidating sketch I've ever played with.  It definitely got me out of my comfort zone!  Check it out:


I decided to go the rainbow route and create a color wheel.  I created the triangle design on my Cameo and then cut it out.  I used patterned papers and washi tapes behind the cut-outs.  I went crazy with my watercolors and modeling paste on the background.  I didn't really know where I was going when I began this page...I just kept experimenting and went with it.  It wound up being a lot brighter than I first thought, and then I added in touches of black with stamping and a black pen.


Lots of detail going on here...I added in some matching floss and buttons for interest.


I love how the modeling paste is so thin that you can still see the color behind it.


I love mixing washi tapes together!  I had planned on using pop dots to create some height between the decorated triangles and the top piece, but then I decided to just flatten it and add lots of embellishments instead.


Go HERE to see the rest of the team's layouts and to upload yours!  Give this sketch a try...especially if you really want a challenge!

Have a great day!

Saturday, November 23, 2013

The Pink Ladies

Happy Saturday, friends!  I created this page for the Tuesday Trigger challenge over on the My Scraps and More forum.  Our monthly theme is THANKFUL, so the challenge was to create a page about friends that you're thankful for.  These fun and special ladies are my gym friends...and we have such a great time together each week!  We actually DO work out hard...but on this day we all dressed alike without knowing it until we got to the gym!  We just had to photograph it :)

I used a lot of the older American Crafts Sketchbook collection on this, mostly because of the bright pinks.  I decided to throw in some blues and yellows, and then went for my stash of washi tapes, mists, stamps and rub-ons.  I also added some modeling paste to my background using an arrow template.  I even threw in some rick rack that I've had collecting dust in a drawer for forever!


I used a black pen to outline my arrows once they dried...I love the messy look it gives!  I also love that the mist ran right through it.


Mist, stamps, and buttons!  It's so much fun to get messy and experiment with different mediums.  The fun part is that it's not perfect, and you just may wind up with something cool you didn't even envision when you started.


I love tucking things behind papers.  This floss was perfect, and I love the way it peeks out behind this curled up yellow paper.


We'd love to have you join us on the boards!

Thanks so much for stopping by today...have a great weekend!

Wednesday, November 20, 2013

The Intriguing Egg

You're probably thinking, "what in the world is this post about?"  Haha!  Well, it's the subject of my layout today :)  This little egg had my little one mesmerized.  My mother-in-law is an elementary school music teacher, and she uses these shaker eggs as an instrument.  They make a cool noise when you shake them, and she brought one for Paige to play with.  She was obsessed with playing with it and rolling it around all over the coffee table.

I used the Here & Now collection from Echo Park for this one.  I used sketch #53 from My Scraps and More.  I am a big fan of bold and bright, and this line is perfect for that!  I added some watercolor and gesso to the background, as well as various matching washi tapes.


I threw in a few buttons here and there, too.  They always add the perfect little touches.


A close-up of the watercolors and layers.  Very easy to do!


I love the dimension that layering and pop dots give!


Another angle of the watercolor work...


Watercolors are a great way to add some color and interest to your backgrounds.  If you need to add a pop of color and don't want to add more paper or another embellishment, add a blob of watercolor.  It's really fun and easy!

Thanks for stopping by, and have a great day!

Monday, November 18, 2013

Sketch Week / My Mind's Eye

Happy Monday, friends!  I'm up on the My Mind's Eye blog today.  It's Sketch Week, and Ronda has an awesome sketch for you to play with.  I'm showing how to use the sketch in a literal, straight-forward way.  I didn't stray from it all.  You can use up some scrap pieces with this one...lots of opportunities for small pieces of paper or embellishments. Go HERE to see the sketch and play along!

I combined the Cut & Paste "Flair" and Cupid's Arrow collections. I also threw in some washi tape, stickers, enamel shapes, buttons, chipboard and did some fussy cutting.


I fussy cut these adorable little frames out...they're perfect for the little squares and rectangles on the sketch.  Aren't these enamel quotation marks so cute?!


These chipboard hearts are so fun...it's hard to see in the layout pic up top that one of the hearts is shiny and red!


And another angle of a dimensional piece with an added heart sticker :)


Be sure to visit the MME blog all this week for different takes on the sketch!  I hope you have time to play along with us :)

Thanks for stopping by!

Saturday, November 16, 2013

3 Cheers for Cheerios

Hey there, friends!  I have a fun page to share today.  I created it a few weeks back for a "Pass it On" challenge at My Scraps and More.  About 10 of us participated in this.  It starts with one scrapper lifting another member's page.  When she's finished, she sends her layout to the next girl on the list.  Each girl's page keeps getting passed on until the last scrapper lifts the one in front of her.  It's really neat to see the full reveal and see how the layouts morph from each lift.  And only the first girl sees the original layout.  It's pretty cool!

Here's mine.  I created my background with modeling paste and a stencil.  I added pink paint to the paste to make it colored.  Works great!  Once it dried, I used gelatos to work in the other colors around the pink.  Then I went through my stash of random papers (all either Michael's or Hobby Lobby brand) and layered them underneath my photo.  Washi tape, stamps, buttons and brads finished it off.


I think these Thickers are my favorite...I just love the font!  That big 3 is from some REALLY old Thickers...it was white and I painted it.


A close-up of the texture....it's so fun to create your own background!


Thanks so much for stopping by today...I hope you have a wonderful weekend!

Thursday, November 14, 2013

Our Little Lucky Charm

Happy Thursday!  I hope all is well with you today :)  Here's a page I made for My Scraps and More a few weeks ago.  It was for our Pinspirational Crop that ended last weekend.  I hosted a challenge involving holiday inspiration, and I selected a photo of a St. Patty's Day craft.  I was inspired by the rainbow, the black pot of gold, and the shiny gold coins.

I used gelatos to create my big colorful circles...they ROCK!  I added some washi tapes and used some American Crafts papers.  I cut the word "lucky" from some gold shiny paper I have in my stash.


I love layers, buttons, tape and outlining with my black pen!


Here you can see the gold shine better.  I need to shine it up more!  I love it!


A close-up of the gelato work...it's like coloring with lipstick!


And a bit closer.  You can color anything with gelatos :)


Thanks for visiting me today...I hope you have a great afternoon!

Wednesday, November 13, 2013

2 layouts & a tutorial for My Creative Scrapbook

Hello there!  Today is our first official "cold" day here in Florida!  It's in the low 60s at lunch time...that is about as cold as we like it...haha!  I know my northern friends are probably laughing their butts off!  I'm sure the 60s is a total warm front for them!  I definitely prefer our summer time temps :)

Anyway, I'm sharing two pages that I created with the November Main Kit.  I created a little tutorial for the My Creative Scrapbook blog as well.  This kit has a lot of Fall-related goodies, and well...we just don't ever really have an actual Fall season.  These photos are from Thanksgiving Day...and everything is still green, and we're still wearing shorts.  So I made a Fall layout "Florida Style"!


I added some modeling paste to the background, rounded up some cord and popped up this Echo Park title sticker.


I colored this flower and painted the wooden banner piece.


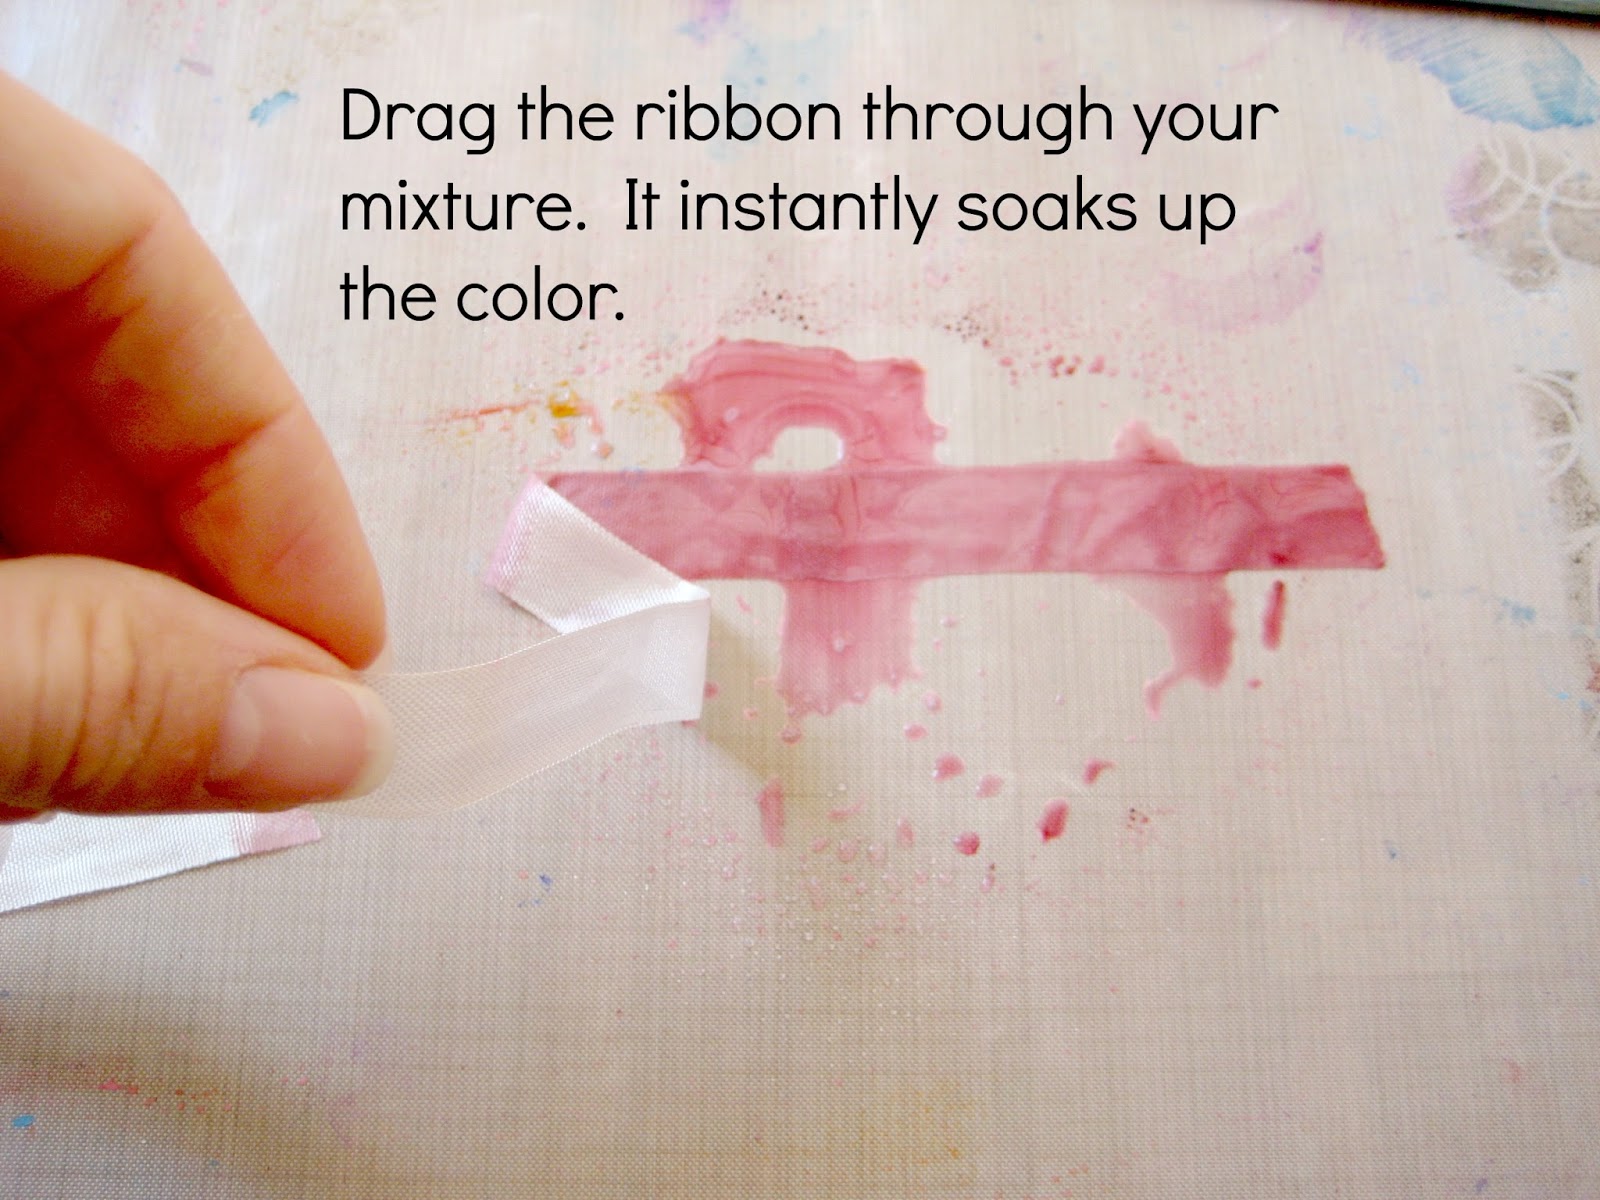
My tutorial is on how I colored this cream colored ribbon.  I wanted to bring in more pink to the layout to match my daughter's shirt, so I dyed it.


I always love getting the neutral colored ribbon in the Main Kits each month.  It's like a blank canvas in which to color it any way you want!  Here's a quick and easy way to customize your ribbon with a few tools likely already in your stash.  Check it out!


My second page is one of my favorites!  I made it a girly page.  I saw the packaging for the Prima flowers and knew instantly I wanted to use it on a layout.  It's a great way to make this otherwise neutral colored page "girly."  I used a Crafter's Workshop template and some ink to created my background lines.


I colored the wooden "love" word as well as the Prima flower.  I love altering things to match!


I colored this flower, too, and tucked it behind my layers.  Peek-a-boo embellishments are fun!


Some pink floss in the corner cluster brings in a spot of pink here...


These American Craft wooden pieces are so much FUN!

 
Another little snippet from my MCS tutorial...As you can see, I used it like I would a piece of patterned paper.  I didn't want to cover up the design on it, so I painted a flower pink and placed it a little to the left. 


So even though this is a Fall kit, you can see how I made it girly.  I hope this inspires you to break out your paints or mists and color something up!

Have a great day!